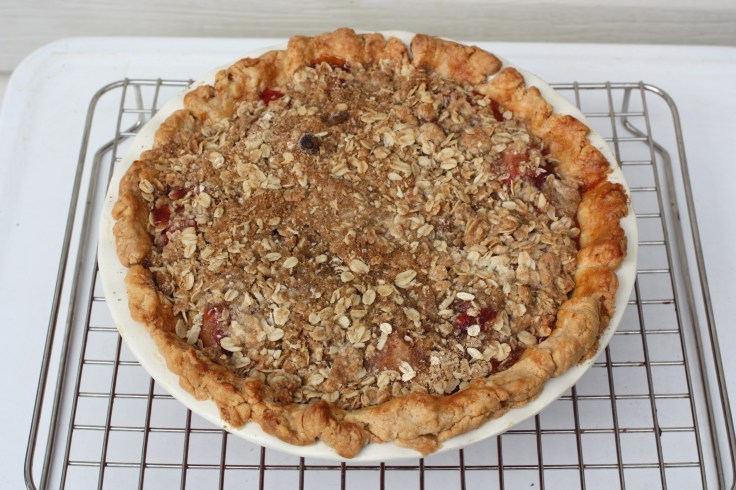
Now I know it’s spring. Time to whip up a pie for The Handyman to celebrate.I’m not the type to read the last chapter of a book first but it’s good to make an informed decision about recipes. This amazingly tart, sweet and beautifully spiced pie recipe comes from Edmonton’s the Duchess Bake Shop cookbook (with some minor modifications).
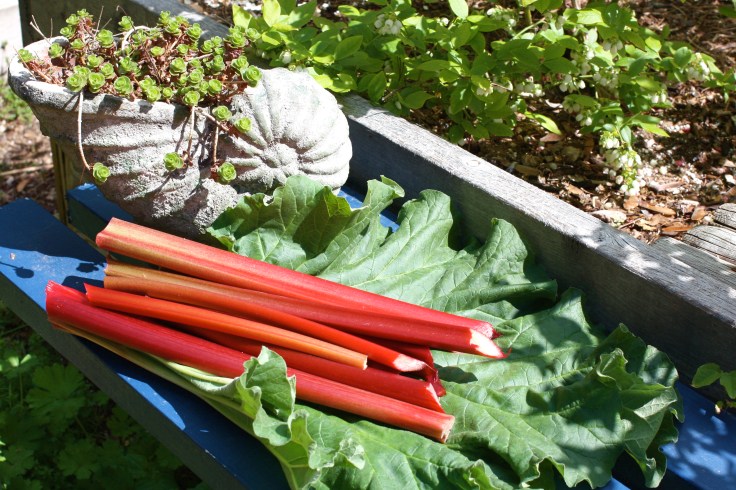
My rhubarb plant, like most of the rhubarb in Naramata, is an unknown heritage variety. Almost every garden has a plant that’s likely been there for years and years. I imagine mine has supplied a lot of rhubarb pies in its lifetime. I hope it’s honoured to be blogged about.
Blind-baked pie shell
For pies that have juicy fillings like rhubarb strawberry, you will need to fully bake the shell before filling it.
In my opinion the best pie crust has half butter and half shortening.
4 cups all-purpose flour
1 cup cubed cold unsalted butter
1 cup cubed cold vegetable shortening
1 tsp. salt
1 cup ice water
Either using a stand mixer fitted with a paddle attachment or a food processor mix or pulse the flour, butter, shortening and salt for 10 or 15 seconds. Add the ice water and mix on medium or pulse until the dough just comes together.
Don’t overmix. You want some small lumps of fat to remain to make the dough flaky.
Shape the dough into three balls. You will only need one ball for this pie so freeze the other two for future pie baking. Wrap the dough in plastic and place in the refrigerator (and the other two in the freezer) for at least a half hour.
Roll the dough out and place in the pie shell.
Freeze the shell for at least 15 minutes at this point.
Brush the pie shell with an egg wash (1 egg white whisked with 1 tbsp cream (or milk).
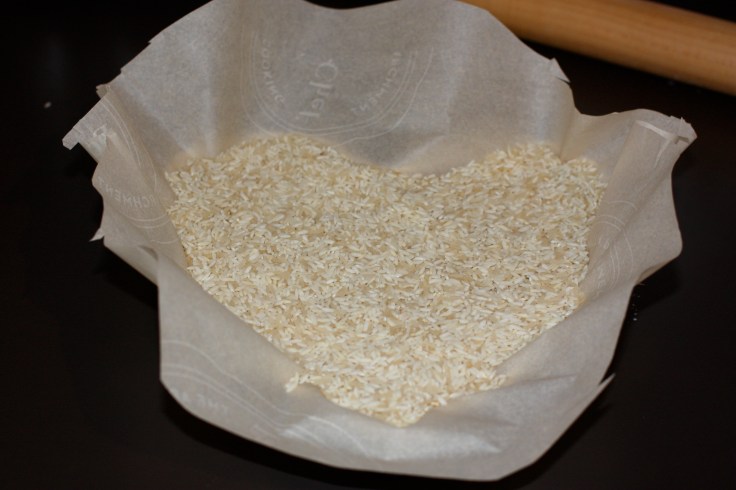
Cut a circle out of parchment and fill the lined shell with dried beans, rice or pie weights.
Save the rice for your next blind baking session.
Bake the shell at 375F for 30 to 35 minutes until the edges are light golden brown. Take it out of the oven, remove the parchment and rice and poke the shell a few times with a fork. Put it back in the oven for an additional 5 minutes.
Crumble
1/2 cup rolled oats
1/3 cup all-purpose flour
1/3 cup brown sugar
1/4 tsp cinnamon
1/4 cup unsalted butter at room temperature
Combine all the above in a bowl and using your hands work it all together until clumps form. Set it aside.
Filling
Cut the rhubarb into 1/2 inch pieces. De-stem and quarter the strawberries.
3 cups rhubarb
3 cups strawberries
1 cup sugar
3 Tbsp cornstarch
1/2 tsp ground cinnamon
1/4 tsp ground nutmeg
1/4 tsp ground cardamom
1 tbsp fresh lemon juice
1/4 tsp orange blossom water
Use fresh nutmeg if you have it…grating it.
To make the filling, in a saucepan, place the rhubarb, sugar, cornstarch, cinnamon, nutmeg, cardamom and lemon juice. Cook over medium heat for about 15 minutes stirring often so it doesn’t burn. Remove from the heat and stir in the strawberries and orange blossom water.
Fill the shell to the rim and top with the crumb topping. Bake the pie at 375F for 40 to 45 minutes, until the crumb is golden brown and filling is bubbling. I like this pie warm out of the oven but it’s good cold too.
The six best words in the English language: Pie is out of the oven. The Duchess Bake Shop cookbook is the bomb. Everything I’ve tried from it has turned out beautifully and it’s fun just to browse and drool over the photos.
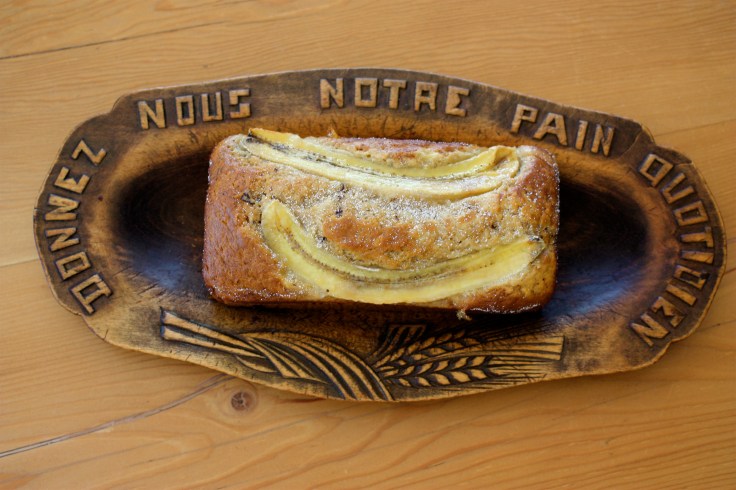
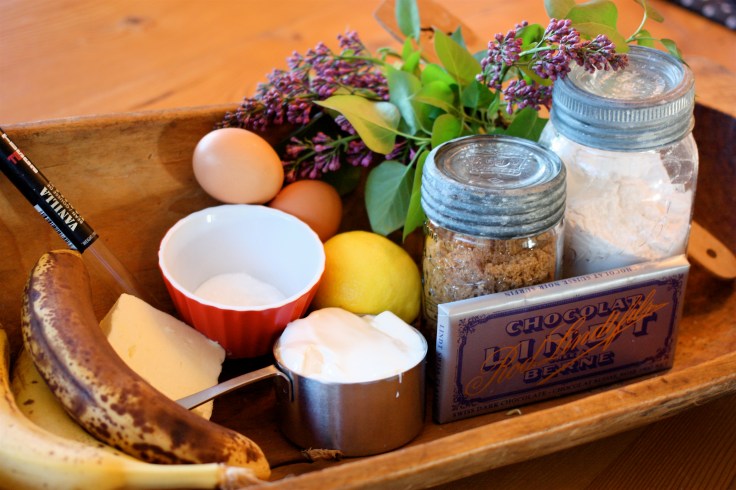
Five things make this gourmet banana bread the best ever. 1. Chocolate chunks from a high quality chocolate bar…I used Lindt. 2. Moistness in the form of sour cream or yoghurt. 3. Real butter. 4. The embedded lemony, sugary half banana slices. 5. The recipe makes two of them.
This recipe for chocolate banana bread makes the best banana bread I’ve ever tasted. It’s not bragging if it’s true. Often gourmet means hard-to-find ingredients, multiple complex steps and lots of dishes to deal with. Not so here. It’s easy to make and you won’t be sorry the recipe makes two loaves. I gave my second loaf to our coffee date pals to take home but you could easily freeze the other loaf (peel off the banana half topping first though as it won’t freeze well). If you don’t eat the other whole loaf in one day…almost impossible but…peel off the banana topping slices (and eat them) before wrapping up the leftovers for the following day.
1 cup very ripe bananas mashed with a fork (about two bananas)
1 cup sour cream or plain yogurt (you could get away with vanilla yogurt if that’s all you have)
2 cups all-purpose flour
1 tsp. baking soda
1/4 tsp. salt
2 eggs (I got mine from Lucy down the road…choose free-range if you can…caged chickens have a terrible life)
1 1/2 cups lightly packed brown sugar
1/2 tsp vanilla extract (use the real stuff if you can)
1/2 cup softened unsalted butter
6 oz. dark chocolate chopped
2 bananas, cut in half lengthwise
2 tbsp lemon juice
2 tbsp sugar
Butter two loaf pans and line each with parchment paper, letting it hang over the sides.
Preheat your oven to 350F.
In a bowl, mash your bananas and combine with the sour cream or yogurt.
In another bowl, sift the flour, baking soda and salt and set aside.
In a third bowl with an electric mixer (or a whisk and a lot of elbow grease), beat the butter until soft and fluffy and add the eggs one at a time until well combined and light. Then add in the brown sugar and vanilla and beat a few more minutes. Stir in the flour mixture alternating with the banana cream mixture. Do not overbeat at this point just mix until combined. With a spatula, stir in the chocolate and spread batter into the pans.
I left the chocolate quite chunky as it gives a nice chocolate surprise effect.
Place the banana halves on a plate and sprinkle with the lemon juice and sugar.
Place the banana halves on top of the batter and push them in lightly.
Bake in the 350F oven with the rack in the middle position for 45 to 50 minutes. They are done when the tops are a light golden brown and a toothpick or knife inserted in the centre of the loaf comes out clean.
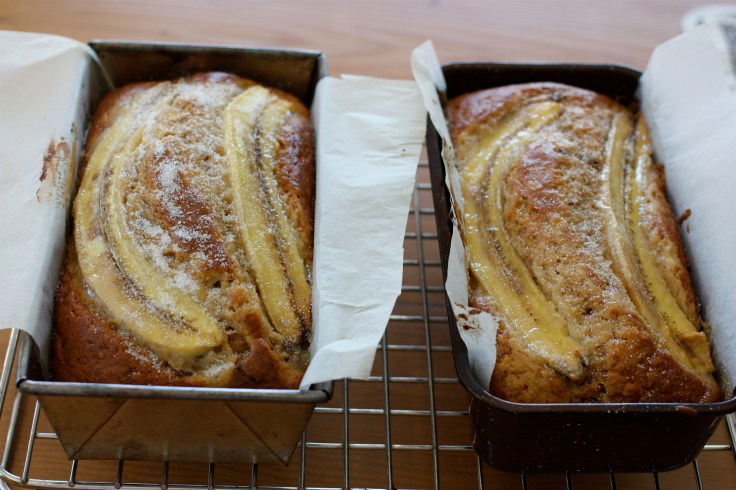
Remove from pan after a few minutes of cooling. I like my banana bread warm so I don’t wait for it to cool completely. Sprinkle a bit more sugar on the top.
Et voila. My French bread plate says, “Give us our daily bread.” Should have added in the word “banana”.
Paris’ famous Laduree’s first Canadian store recently opened in Vancouver and sparked this nostalgic post. Their Paris store window is one of the most beautiful I’ve ever seen. Can’t wait to see Vancouver’s this month.
With the idea that I’d rather spend my travel bucks on chocolate than a tour guide, which I’m not great at tolerating in any case, we found an online self-guidedwalking tour through Saint-Germain-des-Prés’ (6th arr.) most famous chocolate and pastry shops.
Stop one was Ladurée (21, rue Bonaparte). Get this…they invented the double-sided macaron — two almond meringue biscuits joined with various smooth ganache fillings. (This location on Bonaparte now houses their Secrets and Beauty store. Ladurée’s chocolate is now at 14, rue de Castiglione (1st. are.)). They have been in business since 1862.
The person that created this window display at Arnaud Larher at 57 Rue Damremont, must be a master at Jenga. I will help if I can eat all the broken ones.
In case you’ve never tried a macaron, which kind of puts you in the category of never having heard of the Eiffel Tower, they come in an amazing array of melt-in-your-mouth flavours, including bitter chocolate, orange blossom, coffee, rose and my favourite, carmel with salted butter. After purchasing a beautifully boxed selection at Arnaud Larher, next up was Debauve & Gallais.
One more peak at the Laduree window…
A small conference regarding how many chocolates our suitcases will hold at the Debauve & Gallais window.
In operation at the same location (30, rue des Saints Pères) for more than 200 years, the boutique’s wood-panelled interior and semicircular chocolate counter momentarily distracted us from the chocolates. How chocolatey does this chocolate shop smell? Who says scent memory is strong?
One of each please. Signature items include chocolate pistoles, small discs of chocolate flavoured with yummy things like almond oil, bitter coffee, Bourbon vanilla and orange blossom.
How ironic. Debauve & Gallais started out as an 1800s health food store. The chocolate was used to make bitter medicines taste better and the chocolate was marketed as promoting vigour and health. Ok.
We also stopped in at Pierre Hermé at 72, rue Bonaparte, but by this time my camera was sticky with chocolate I had to focus solely on the pastries made by a fourth-generation pastry chef.
What? You guys eating chocolate? Street art on our walk in Saint-GermainAll that chocolate required some cafe.
After our four stops we got distracted by the street life and shopping and will have to go back to visit Gerard Mulot, Pierre Marcolini, and Chocolate de Neuville another time.
Lucky us, Ladurée has opened its first Canadian location on Robson Street in Vancouver. We are heading there in three weeks to run the marathon (Handyman) and the half (me) and plan to get a macaron fix after our run.
If you can’t make it to Paris or Vancouver, here is Ladurée’s recipe for Cake au Citron (lemon cake) which is flavoured with lemon…four ways…and a tiny bit of rum. It’s easy to make despite its fancy French heritage although be sure to poach your lemon slices the night before so they can soften nicely.
A “secret” Laduree lemon cake recipe
Poached lemon slices:
3 lemons
1 cup water
1/2 cup + 2 tbsp granulated sugar
Lemon cake batter:
5 tbsp + 1 tbsp unsalted butter
1 2/3 cups + 1 tbsp all-purpose flour
1 tsp active dry yeast
1 lemon
1 1/4 cups granulated sugar
3 eggs
1/2 cup minus 1 tbsp cream
1 pinch coarse sea salt
1 2/3 tbsp rum
Lemon syrup:
1/2 cup water
1/2 cup + 2tbsp granulated sugar
1/4 cup real lemon juice
Lemon glaze:
2 oz. lemon jelly (or apricot jelly if you can’t find lemon)
1 tbsp water
The night before baking, cut lemons into thin (2 mm) slices. Bring water and sugar to a simmer and add the slices. Poach over very low heat for 20 minutes. Don’t boil. Cool and then refrigerate for at least 12 hours.
Set aside six of the poached lemon slices for decoration. Drain the remaining slices and measure a 1/2 cup and cut each slice in half.
Butter a loaf pan, dust with flour and line with a rectangle of parchment paper to make the unmoulding easier.
Place the 5 tbsp of butter in a saucepan and melt over low heat.
Sift the flour and yeast into a small bowl. Grate the zest from the lemon and toss with the sugar in a large bowl. Add the eggs one at a time, while whisking. Continue to whisk and add the cream, salt and rum. Fold in the flour and yeast mixture, halved lemon slices and lukewarm melted butter.
Preheat oven to 410F. Fill the loaf pan with the batter to 2 cm below the rim. Place in the oven and bake for 10 minutes. Remove from the oven, and using a knife, make a slit lengthwise in the crust that has formed on top. You will use this slit to soak the cake in the lemon syrup later. Return the cake to the oven and then lower the oven temperature to 350F an bake for 45 minutes. When ready, a knife inserted in the cake should come out clean, dry and free of crumbs.
While the cake is baking, make the lemon syrup by bringing the water, sugar and lemon juice to a boil. Remove from heat.
Placing a cooling rack on a rimmed baking sheet. When the cake is done, remove from the mould and place on the rack. Bring the syrup to a simmer. Using a ladle, pour syrup over the cake and allow to soak in. Gather syrup from baking sheet and pour over cake. Repeat twice. Cool and then decorate with the reserved poached lemon slices.
To make the lemon glaze, stir together jelly and water. Lightly heat without boiling until the mixture is thick enough to coat the back of a spoon. Coat cake with glaze.
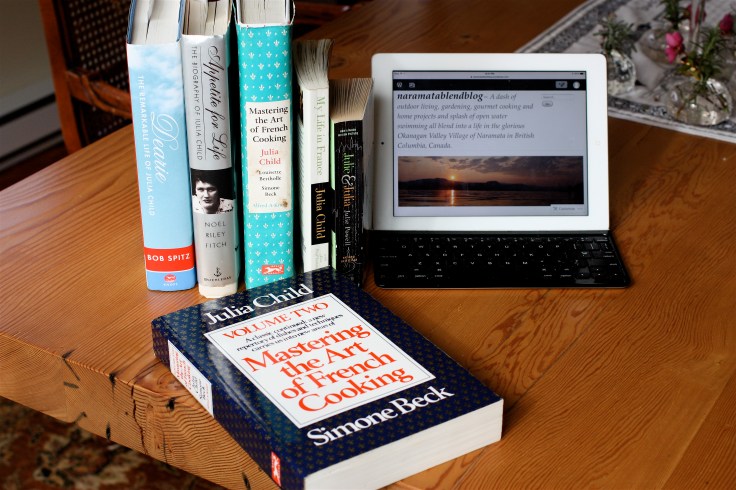
Julia Child was the rocket scientist equivalent in the cuisine world. Every ingredient, every step of every recipe was researched, tested, re-tested for, “those who like to cook and/or want to learn, as well as those who are experienced cooks, including professionals,” Julia said as she slaved for years on her cookbooks. “So we have to keep the dumb debutantes in mind, as all as those who know a lot…” (I land somewhere in the middle).
As you can see, I’m a bit of a Julia Child freak
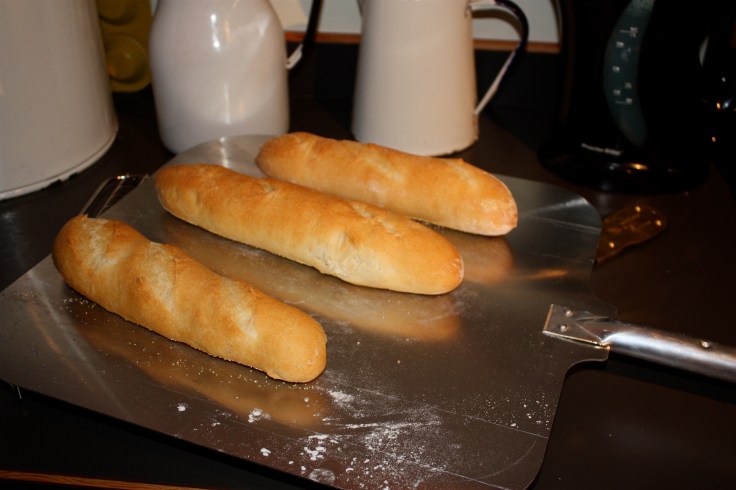
Her biggest challenge was the French bread recipe that takes up 21 entire pages in Mastering the Art of French Cooking Volume Two. My throw down to you is to give it a whirl. Here’s why:
4. Julia and her husband Paul spent more than a year to perfect a French bread recipe that could be duplicated at home with American ingredients. The couple used 284 pounds of flour to develop the master bread recipe in countless experimental batches.
5. French bread has these four ingredients: Flour, salt, yeast and water. Julia and Paul experimented with fresh and dried yeasts, various flour mixtures, rising times and trickiest of all, how to get moisture into the oven to simulate a French baker’s oven and to give it the right golden colour and crispness of French bread.
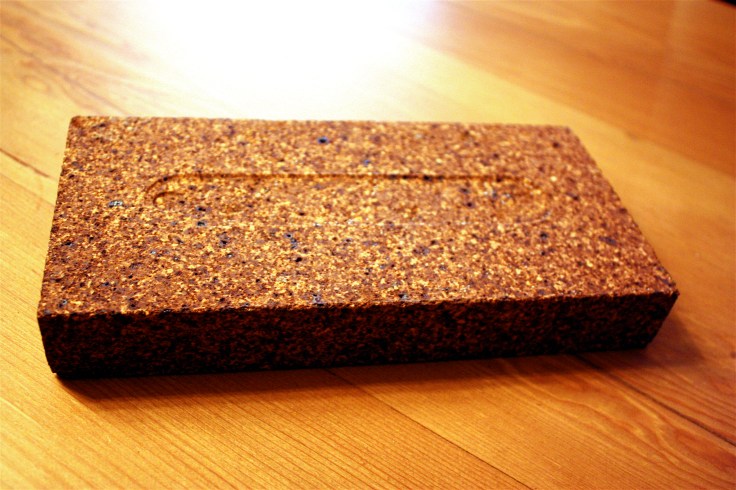
6. With the help of Professor Raymond Calvel, the head of the state run École Professionnelle de Meunerie in Paris, the world’s leading authority on French bread, they cracked the code. A brick in a pan filled with steaming water coupled with a pre-heated clay (or pizza) stone to cook the bread on were the winning techniques. Lucky me, with my new wood-fired oven, I just steam it up with a spray bottle and pop my loaves onto the hearth and no longer need the brick trick.
7. The directions in Mastering Vol. II are unbelievably detailed and include little sketches of exactly how to shape the loaves.
8. Julia and Paul did all the hard work and loaf burning for us. See my post…Things I lost in the fire…so we don’t have to. If you follow the supremely clear and detailed directions your loaves will turn out…perfectly.
9. You will get so cocky you might even make brioche.
10. What better way to honour Julia’s legacy than bringing out three, golden, fragrant, perfectly crusty loaves that are even better than boulangerie bread. You can do this even if you are a dumb debutant. Pretty good bragging rights re the 21-page recipe as well.
The secrets to a good crêpe are a good batter (with some nice flavouring) and a great pan. Julia Child is my batter whisperer and a wonderful houseguest provided the pan: The Rock made by Starfrit. (This pan is the bomb. Its shallow rim makes crepe flipping easy and it is truly non-stick.)
A crêpe is basically a very thin, tender pancake. Crêpe sounds so much better than pancake too don’t you think? Translating English into French doesn’t always work to class things up though. An Irishman offering English Channel swimming advice referred to sea sickness as mal de mer….cool name, still a bad thing. I digress…
Here is Julia’s recipe for a light batter for sweet breakfast crêpes that are great with a drizzle of lemon and a sprinkle of sugar or rolled up with a filling of fresh berries. It couldn’t be easier as you make them in the blender the night before.
3/4 cup milk
3/4 cup cold water
3 egg yolks
1 tablespoon granulated sugar
3 tablespoons orange liqueur, rum or brandy (I use brandy. If you like, substitute a teaspoon of vanilla or orange blossom flavouring and make the rest of the missing liquid up with water.)
1 cup flour
5 tablespoons melted butter (Don’t even think about using margarine. Julia wouldn’t like it.)
Place the ingredients in the blender jar in the order in which they are listed. Cover and blend at top speed for one minute. Cover and refrigerate for at least two hours or overnight. OK why let it rest for two hours? This is what I love about Julia…she tells you why. The rest allows the flour particles to expand in the liquid and insures a tender, light and thin crepe.
Brush your pan lightly with butter. (If you don’t have thoughtful houseguest to bring you the perfect pan, a regular skillet will work although the flipping will be tricky and you may want to go with a spatula.)
Pour 1/4 cup of batter into the heated pan. Lift the pan and quickly tilt in all directions to run the batter all over the pan in a thin film. Return the pan to the heat for 60 to 80 seconds. Jerk and toss pan sharply back and forth to loosen the crêpe. Turn the crêpe using a spatula if timid or try the flip method. It’s all in the wrist.
Cook for about half minute on the other side and serve. If you make a batch a bit ahead they can be kept warm in the oven.
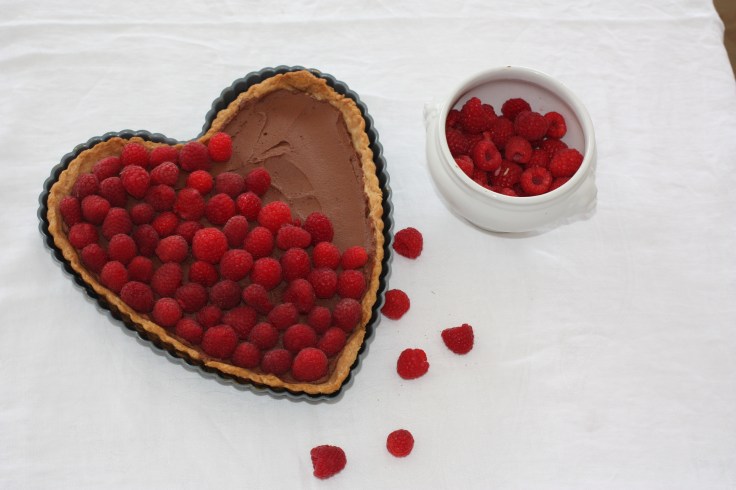
This raspberry-ganache tart is a lot simpler to make than it looks and you can’t beat the combination of rich chocolate and fresh raspberries. I love my heart-shaped tart pan and use it a lot. You can use round or square tart pans if you prefer.
Make a recipe of tart pastry dough. I make mine in a food processor.
1 cup cake flour
1 cup all-purpose flour
1/2 teaspoon salt
3/4 cup cold butter, cut into cubes
7 tablespoons water or heavy cream, or 2 eggs lightly beaten
Combine both flours and the salt in the food processor and process for 15 seconds.With the processor off, add the butter and liquid and process for 30 more seconds. If the dough still looks powdery, add up to 2 more tablespoons of liquid. Form into a disk, place in plastic wrap and refrigerate for about an hour.
Blind bake your tart shell. Roll pastry out and place in a tart pan that has a removable bottom.
Place a sheet of parchment paper over the dough-lined pan and pour in enough dried beans or rice to come up to the sides. Bake for about 15 minutes at 400 degrees F. Remove from oven when the edges are golden brown. Remove the parchment paper and rice. (Store the rice for future blind baking needs). Put the tart shell back in the oven and bake a further 15 minutes until the inside of the tart shell is golden brown.
Make the chocolate ganache
8 ounces good quality bittersweet chocolate, chopped (I use Callebaut chocolate) (Great baking starts with great ingredients)
1 cup heavy cream (I’ve even found lactose free whipping cream for the Handyman)
Place the chocolate in a heatproof bowl. Bring the cream to a simmer on the stove and pour it over the chocolate. Let the mixture sit for about 10 minutes, or long enough to melt the chocolate. Stir the ganache with a rubber spatula and then switch to a whisk and stir until smooth and the consistency of sour cream. If you like a lighter texture, whisk the ganache with an electric mixer until it is light and fluffy. (This gives you the consistency as pictured below.) Cool this mixture before assembling your tart.
Place two or so pints of fresh raspberries on your cooled tart. Remove from tart pan and sprinkle with icing sugar. Place in the fridge until a half hour before serving. Add whip cream or serve with ice cream if you aren’t afraid of the calories.


 Butter two loaf pans and line each with parchment paper, letting it hang over the sides.
 Place the banana halves on top of the batter and push them in lightly.
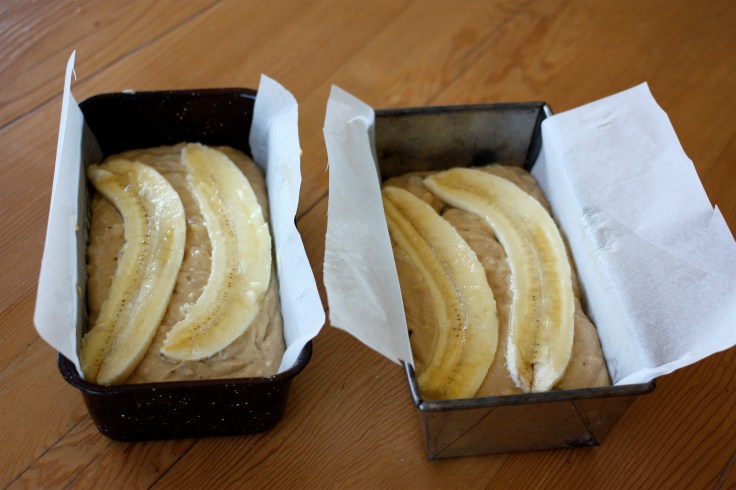
 Et voila. My French bread plate says, “Give us our daily bread.” Should have added in the word “banana”.
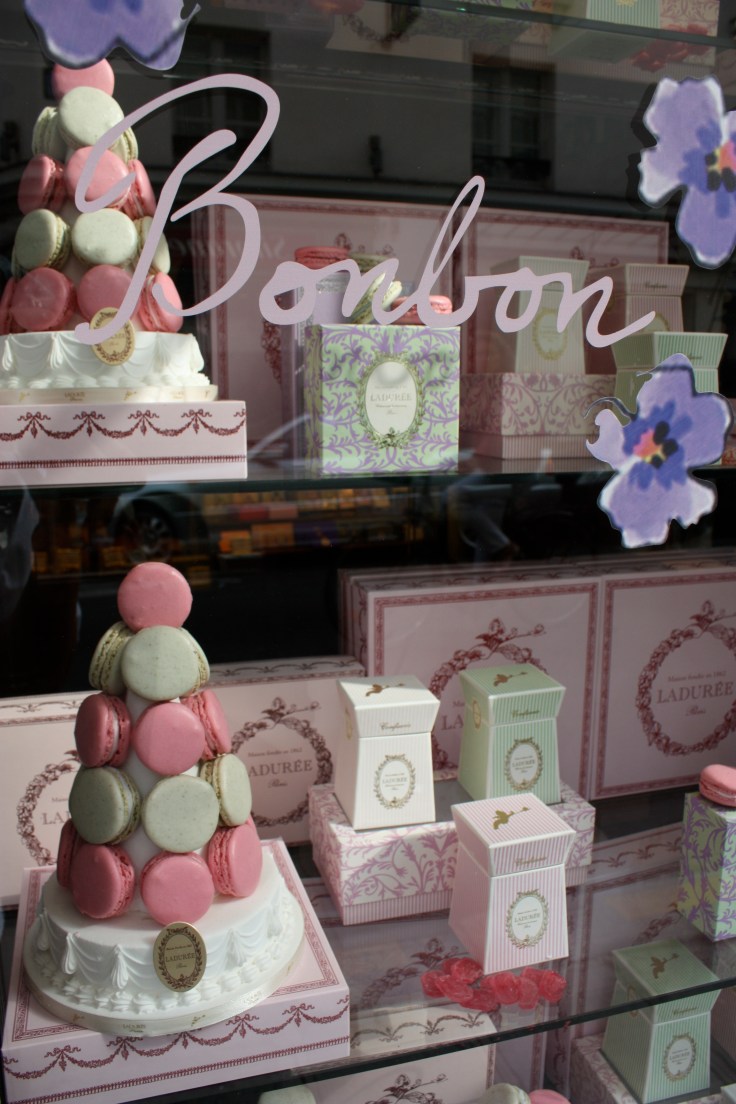


 1.You need
 3. Bricks are cheap.
 5. French bread has these four ingredients: Flour, salt, yeast and water. Julia and Paul experimented with fresh and dried yeasts, various flour mixtures, rising times and trickiest of all, how to get moisture into the oven to simulate a French baker’s oven and to give it the right golden colour and crispness of French bread.
 6. With the help of Professor Raymond Calvel, the head of the state run École Professionnelle de Meunerie in Paris, the world’s leading authority on French bread, they cracked the code. A brick in a pan filled with steaming water coupled with a pre-heated clay (or pizza) stone to cook the bread on were the winning techniques. Lucky me, with my new wood-fired oven, I just steam it up with a spray bottle and pop my loaves onto the hearth and no longer need the brick trick.
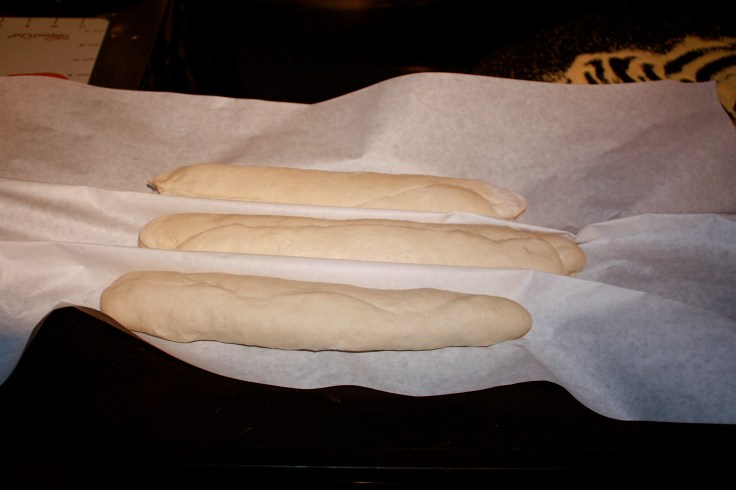 7. The directions in Mastering Vol. II are unbelievably detailed and include little sketches of exactly how to shape the loaves.
 8. Julia and Paul did all the hard work and loaf burning for us. See my post…Things I lost in the fire…so we don’t have to. If you follow the supremely clear and detailed directions your loaves will turn out…perfectly.
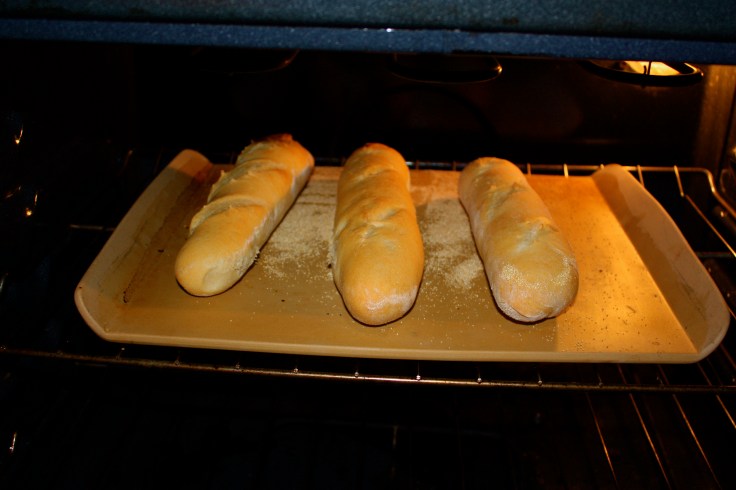
 9. You will get so cocky you might even make brioche.
 The secrets to a good crêpe are a good batter (with some nice flavouring) and a great pan. Julia Child is my batter whisperer and a wonderful houseguest provided the pan: The Rock made by Starfrit. (

 This raspberry-ganache tart is a lot simpler to make than it looks and you can’t beat the combination of rich chocolate and fresh raspberries. I love my heart-shaped tart pan and use it a lot. You can use round or square tart pans if you prefer.
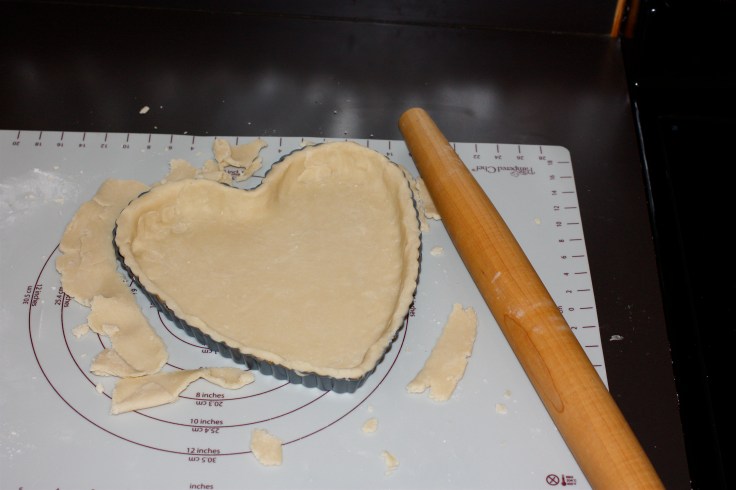
 Place a sheet of parchment paper over the dough-lined pan and pour in enough dried beans or rice to come up to the sides. Bake for about 15 minutes at 400 degrees F. Remove from oven when the edges are golden brown. Remove the parchment paper and rice. (Store the rice for future blind baking needs). Put the tart shell back in the oven and bake a further 15 minutes until the inside of the tart shell is golden brown.
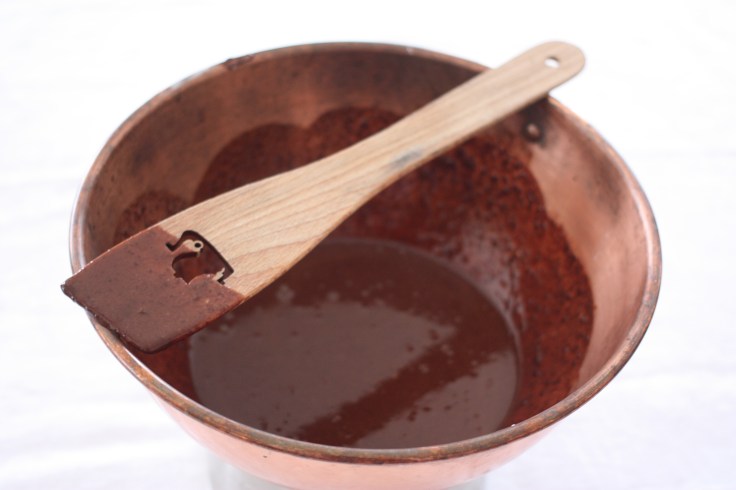
 Place two or so pints of fresh raspberries on your cooled tart. Remove from tart pan and sprinkle with icing sugar. Place in the fridge until a half hour before serving. Add whip cream or serve with ice cream if you aren’t afraid of the calories.