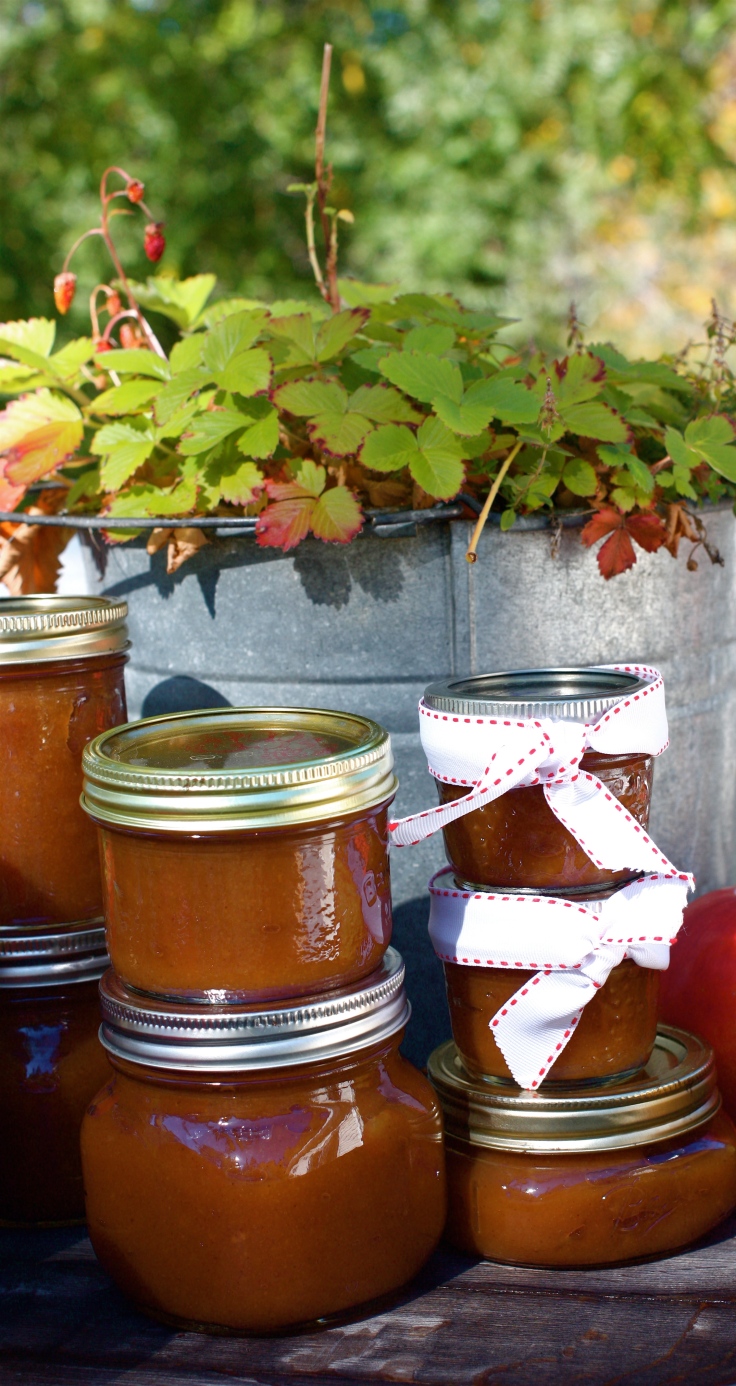
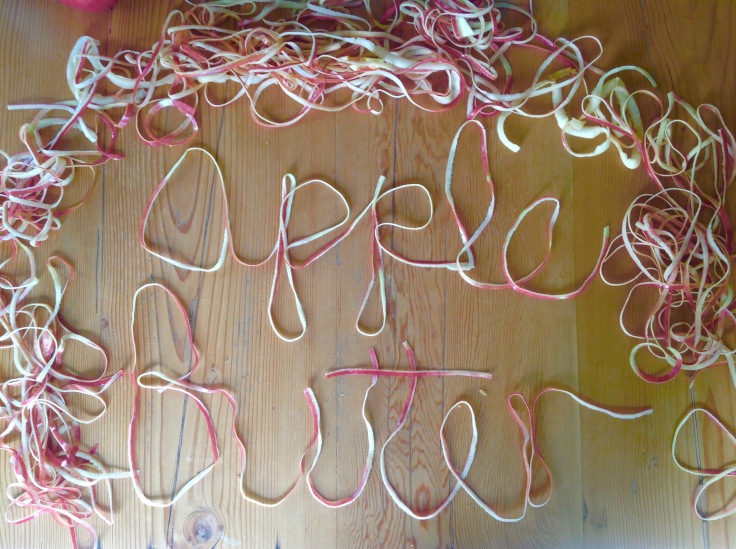
Apple butter thickly laid over a heavy slice of bread warm from the oven is a pioneer staple that deserves a revival in the orchard-rich Okanagan Valley.
Apple butter is a highly concentrated form of apple sauce produced by long, slow cooking of apples to a point where the sugar in the apples caramelize turning the apple butter a deep brown. Originating in the Middle Ages at monasteries with apple orchards, the secret to making this delicious preserve came over to colonial America with the settlers. Apple butter originated as a way to store apples without refrigeration, before canning was available. Groups would get together for an all-day affair that involved big kettles filled with apples, cider and spices that required constant stirring with big wooden paddles.
Everything you would ever need to know about the historical methods of making apple butter and a recipe to make your own with original methods can be found on the skill cultblog. It’s author encouraged me to try to the historical version but a bit leery on the food safety question, I decided sterilizing jars and finishing off with a good hard boil in a canner was a surer bet.
My recipe is a modern version using a crockpot, an apple peeler (can peel by hand) and an immersion blender (can use a blender or a whisk) and requires no all-day wooden paddle manning. Maybe I’m missing out although I’m happily married to my swain, The Handyman…
Here is where the fun came in, or the ladle was too large, in theory, at least, to be handled by one person, and it was customary for the girls and boys in pairs to take turns in stirring. The lady always had the choice of a partner to assist her when her turn came, and whichever swain she selected was regarded by the others as her favourite beau… The Conquest of Missouri, Joseph Mills Hanson, 1918
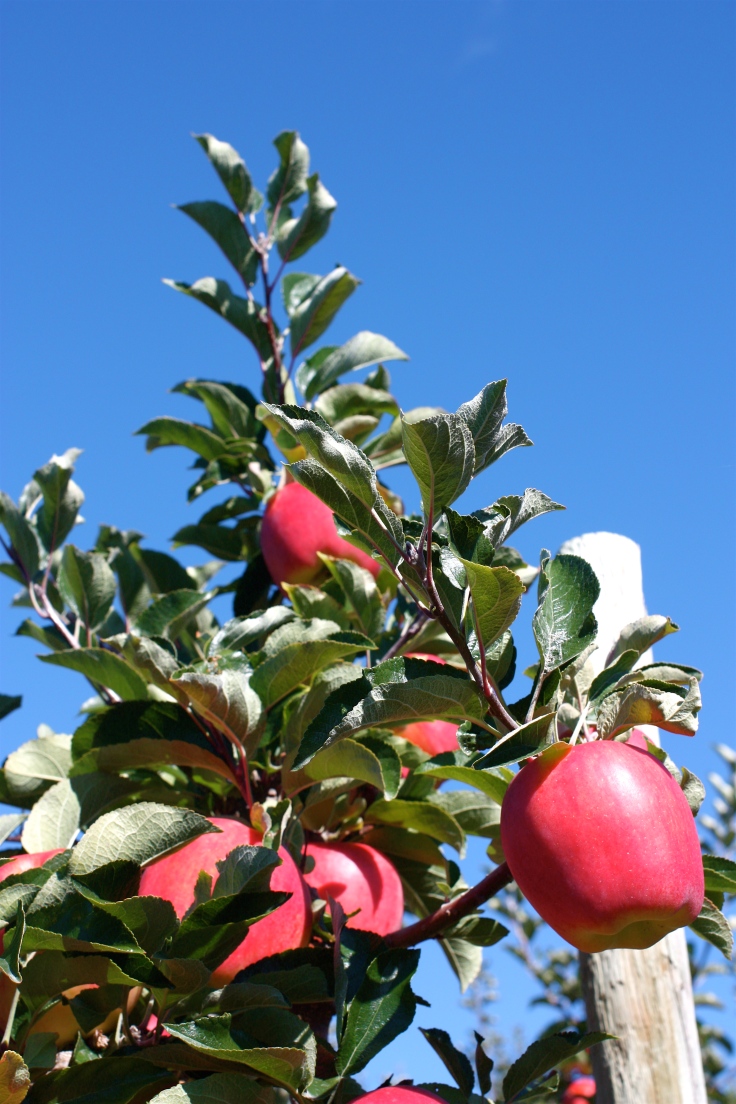
Step One: Apples
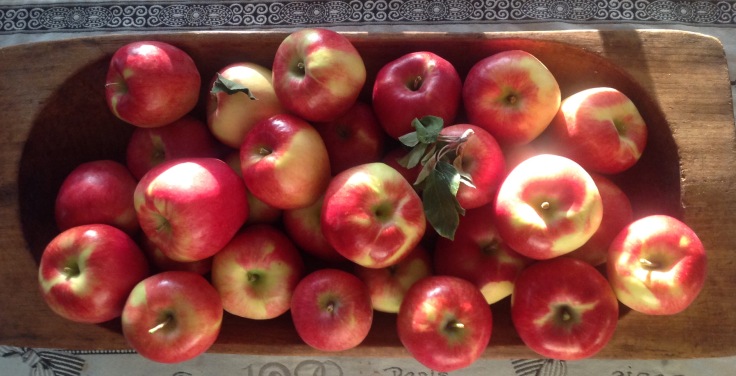
Karolina and Doug from Forest Green Man Lavender farm in Naramata kindly gifted me a beautiful box of these lovely Gala apples. Any sweet apple will do or you can mix different varieties.
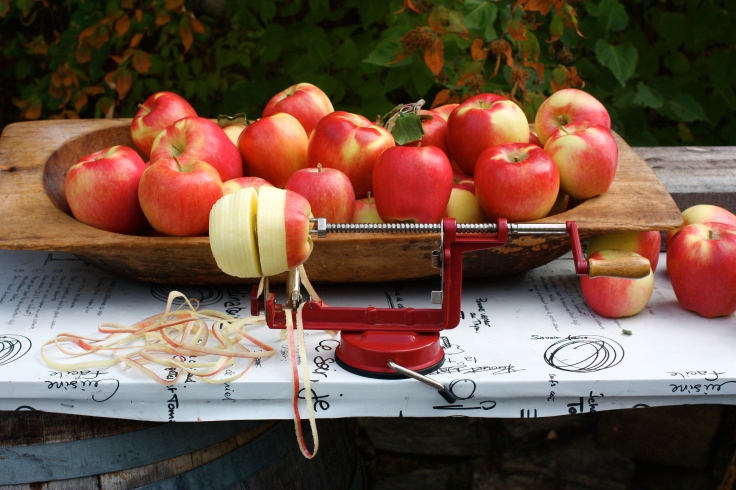
Step 2 Peel
Peel, core and slice your apples. This handy gizmo does all three licketty-split.
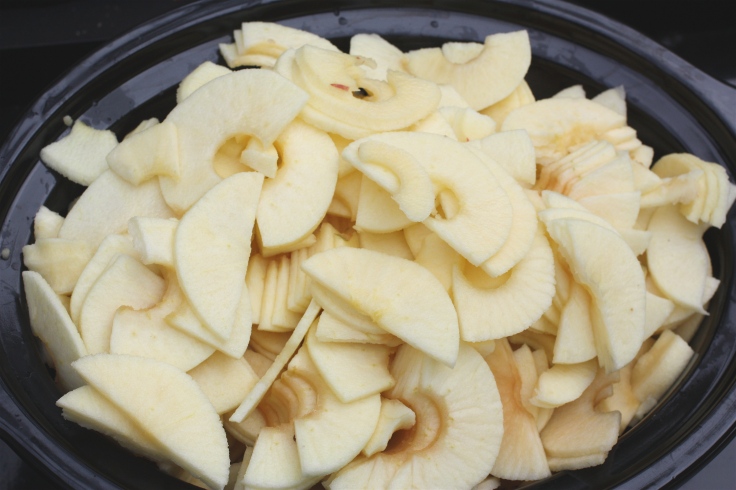
Step 3 Fill your crock-pot
Fill your crock pot to the brim. The apples will settle quite a bit as they cook and soften.
Step 4 Add sugar and spices
Add 1 to 2 cups of sugar (to taste),( I made some of it brown sugar for flavour), add 1 tsp. or 2 tsp. cinnamon (depending on the size of your crock pot), 1/4 tsp ground cloves, pinch of salt, 1/2 tsp allspice and one whole vanilla bean pod. Just sprinkle these ingredients on top of the apples. (Remove the vanilla pod before loading into jars)
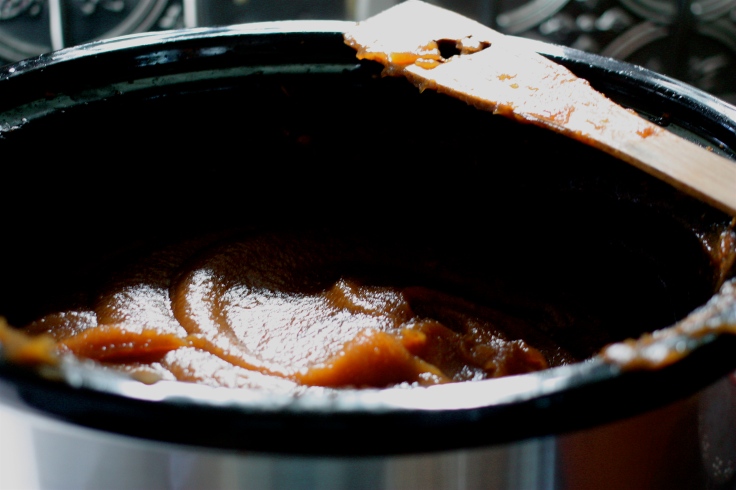
Step 5 Cook on low for about 10 hours
If you peel your apples in the evening, leave the crock pot on low overnight with the lid slightly ajar to let steam escape. In the morning, use an immersion blender or transfer your applesauce into a blender to smooth out the mixture and then replace in the crock pot. Remove the lid for the last hour or so of cooking to thicken the mixture. (It will thicken a bit further after it cools.) Let it cook to your desired consistency. It will turn a nice scrumptious carmel colour.
Step 6 Water bath can your apple butter. Sterilize your canning jars, fill them leaving 1/4 inch head space, wipe rims clean, place your lids on and place in a canner filled with boiling water and boil for 15 minutes.
Your house will smell amazing during the long slow apple cooking. Apple butter on raisin cinnamon bread is match made in heaven.My last step was to drop off some jars at Karolina (pictured above with her rescue pal) and Doug’s lavender farm from whence the apples came. Thanks guys! I left with 20 pounds of beautiful Anjou pears. Mmmmm so it begins. Pear tarts?
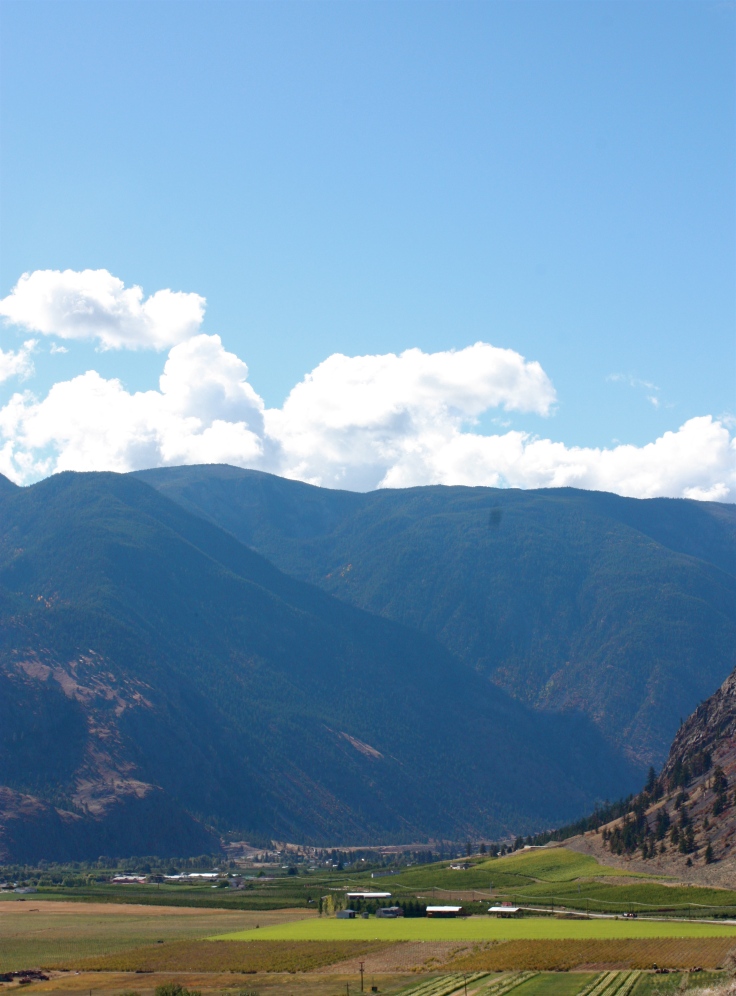
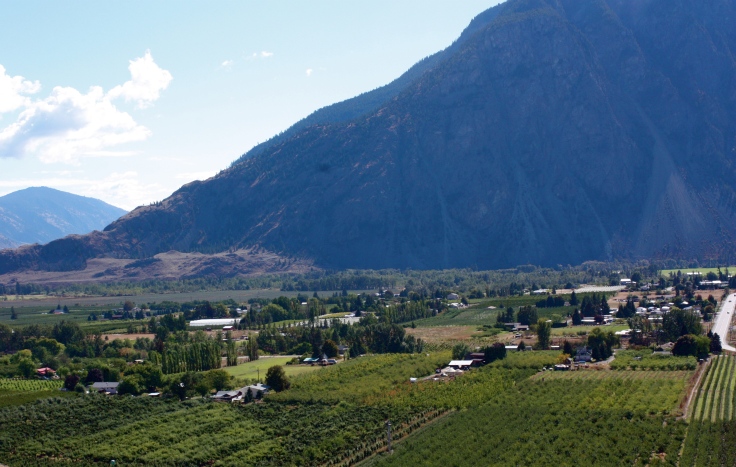
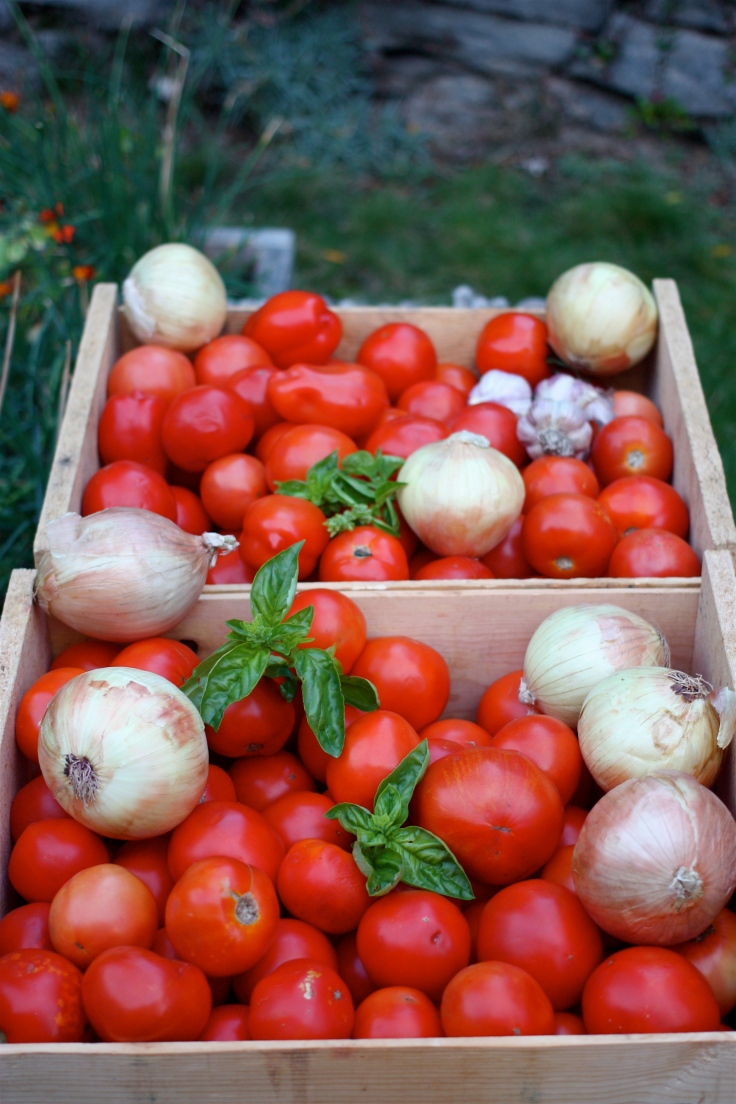
Keremeos in British Columbia’s fertile Similakameen Valley is bathed in sun and heat for 181 frost-free days resulting in the best tomatoes in the world and a price that will blow your socks off.
Top down to take advantage of the sun on the first day of fall, The Handyman and I head out from Naramata past Almost a Ranch, Foggy Mountain Ranch, Cedar Creek Ranch and the infamous Crazy Zach’s junk/antique on the way to the “Fruit Stand Capital of Canada” on our annual pilgrimage to bring home some summer to store for greyer days ahead.
I always feel a bit like Toad from the Wind in the Willows out for adventure on days like this…One of Zack’s treasures in a tomato red.
Harvest days.
A still life in gourds.There is something about the light in the fall…These 40 lbs. of vine-rippened beauties cost a grand total of $9.98. Add in some Walla, Walla onions and red Russian garlic and your total is somewhere around $16 bucks.
Nonna’s secret tomato sauce recipe
(Disclaimer…I am not Italian and do not have a Nonna but if I did this would be her recipe…I have made this basic but lovely tomato sauce for years and it pays homage to Keremeos’ bounty. This makes a lot of sauce at one time and takes advantage of Farmer’s Market tomato prices.
20 lbs. of perfectly ripe tomatoes
3 or 4 large onions chopped
4 to 6 cloves of garlic chopped
1/2 cup of Similkameen honey
2 tablespoons dried oregano
2 tablespoons salt (or to taste)
2 tablespoons fresh thyme
1/4 cup of fresh basil
2 teaspoons pepper
splash of olive oil (if freezing your sauce, omit if canning)
If you are freezing your sauce you could also choose to add in peppers, mushrooms…Don’t add in if canning as the additional fresh vegetables will change the pH so it’s unsafe for water-bath canning…
You can either can or freeze this recipe. If canning, omit the olive oil (very important) and follow standard canning direction adding 2 tablespoons of lemon juice to each quart jar after filling. This ensures that the sauce will be safely acidic.
Soften onions and garlic in a splash of olive oil (if freezing sauce) or in a small amount of water in a heavy large pot. (I actually use two large pots, dividing the onions and garlic between them, as one won’t hold 20 pounds of tomatoes.) While the onions are softening, begin preparing your tomatoes.
Add tomatoes in batches to a pot of boiling water for about minute and transfer to a cold water bath (I use the sink). This will make peeling easy… the skin will just slip off. Take a paring knife and cut out the stem end and remove the peeling skin and discard. I then give each tomato a bit of squeeze to eliminate some of the juice so you will have a nice thick sauce. Add the peeled, squished tomatoes to the onions, bring to a boil and then simmer.
Once all your tomatoes have been added to the pot or pots, add in your seasoning reserving the fresh herbs until the sauce has finished cooking. Simmer on low for two to three hours until your sauce reaches your desired thickness. Be sure to taste and adjust your salt and pepper if necessary.
If you like a smooth, uniform sauce, add the cooled sauce to a blender for 30 seconds or so. Add about three cups to each freezer bag and place all the bags on a cookie sheet (to prevent leakage in your freezer) and freeze. Remove the cookie sheet after your sauce is frozen. If you prefer to can your sauce, load your jars, add the lemon juice and place in a canner and boil for 35 minutes. (Do some canning research if you haven’t canned before so you know how to sterilize your jars and so on…)
Tomato-coloured pot not necessary but awesome right?
This three-layer carrot cake has three cups of carrots and a cup of pineapple and the cream cheese frosting is livened up with lemon zest and fresh lemon juice.
Every birthday deserves a home-made layer cake. Making one for my daughter Lizzie gives me as much pleasure as it gives her, more really. Healthy lifestyles are super important to our family but come on… it’s a birthday and a once-a-year excuse to pull out all the stops.
Fresh garden carrots and pineapple make this cake deliciously moist.
Carrot cake ingredients
2 1/4 cups all-purpose flour
2 tsp baking powder
2 tsp baking soda
2 tsp cinnamon
3/4 tsp salt
3/4 cup grapeseed oil
1 1/4 cup granulated sugar
1/2 cup firmly packed brown sugar
4 large free run eggs
3 cups shredded carrots
1 cup crushed pineapple, drained
Pre-heat oven to 350F and grease and flour three 8-inch cake pans.
Sift together the flour, baking powder and salt and set aside. In the bowl of a stand mixer fitted with the paddle, beat together the oil and sugars for 2 minutes and turn the mixer to medium-low and add the eggs, one at a time. Add the flour mix in two batches and mix until just incorporated. Add carrots and pineapple and mix until just combined. Evenly divide the batter among the three pans and bake for 25 to 30 minutes, or until a toothpick inserted into the centre of the cakes come out clean. Cool and remove from the pans.
The addition of lemon adds a nice zest and pretty colour to the frosting.
Lemon cream cheese frosting
4 ounces softened cream cheese
1/2 cup butter at room temperature
3 1/2 to 4 cups sifted confectioners’ sugar
2 tsp finely grated lemon zest
2 tsp fresh lemon juice
1/2 tsp pure vanilla
In the bowl of a stand mixer with the paddle attachment, beat the cream cheese and butter on medium speed until smooth. Turn the mixer to low, gradually add the confectioners’ sugar, lemon zest, lemon juice and vanilla and mix until fluffy.
Vanilla Swiss Meringue Buttercream ingredients.
Buttercream
1/2 cup plus 2 tbsp large egg whites
1 1/4 cups granulated sugar
2 cups butter at room temperature, cubed
2 tsp pure vanilla extract
few drops of yellow food colouring
Place the egg whites and sugar in the bowl of a stand mixer and whisk together by hand to combine. Place the bowl on the top of the a saucepan filled with a few inches of water on medium-high heat to create a double boiler. Whisking intermittently, heat the eggs mixture until it registers 160F or is hot to the touch. Once hot, fit the bowl onto your mixer and whisk the egg white mixture about 8 to 10 minutes. The mixing bowl should be room temperature and the eggs should hold a medium-stiff peak when done. Swap out the whisk for a paddle attachment and add the butter a bit at a time with the mixer on low. Once all the butter is added, turn up the mixer and beat until smooth for about 3 to 5 minutes. Add a few drops of yellow food colouring to achieve a light lemon colour.
Some assembly required
Choose which will be your bottom layer and place it on a cake plate. Spread half the cream cheese frosting with an offset spatula. Top with another layer and spread the remaining frosting. Add the final layer and ice the top and sides of the cake with the vanilla buttercream. Make the spun-sugar decoration just before serving as it will only hold its shape for a short time.
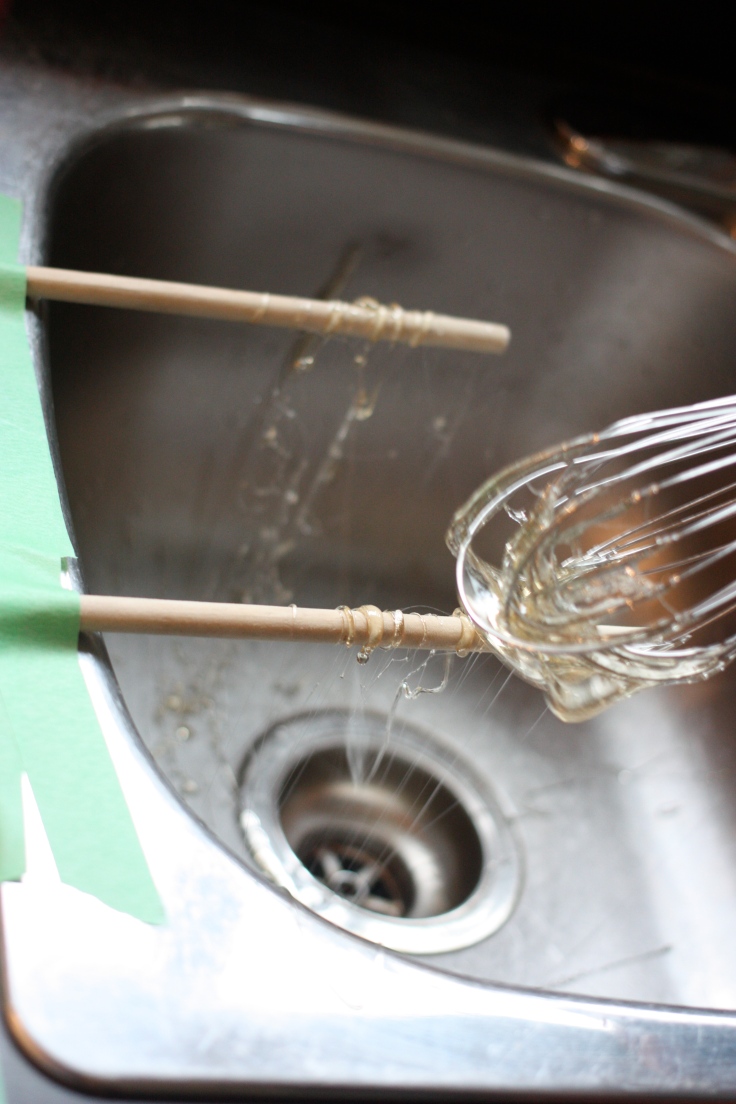
Secure two wooden spoon handles to your sink with tape.
Spun sugar
2 cups granulated sugar
1/2 cup light corn syrup
Secure two wooden spoon handles with tape over your sink. Add the sugar, corn syrup and 1/2 cup of water to a saucepan and heat on medium-high until the mixture reaches 300F, about 10 to 15 minutes. Meanwhile prepare an ice bath in a large metal bowl and set aside. As soon as the sugar reaches 300F remove from the heat and submerge the bottom of the pan in the ice bath. Let it stand about a minute and then dip a wire whisk into the sugar and wave it back and forth over the spoon handles. Working as you go, gather the strands and shape into a round shape with your hands about the size of your cake and add to the top of your cake.
Your spun sugar will dissolve if you refrigerate your cake…Lovely Lizzie Lemony Carrot Cake!
Give us our daily banana bread…but please add Quebec maple syrup.
Even non banana bread lovers will be won over with this Canadian version sweetened with maple syrup and topped with a maple, nut crumble. So good eh?
Don’t even consider using anything but real Quebec maple syrup.
Crumble
3/4 cup of nuts, lightly toasted and finely chopped. You can use walnuts, pecans or flaked or slivered almonds.
2 teaspoons of Quebec maple syrup
1/2 cup of brown sugar
1/4 cup all-purpose flour
1/4 tsp cinnamon
1/4 cup softened butter
Combine all ingredients except the butter in bowl. Add the butter and mix with your fingertips until the crumble is just moistened and set aside.
Bread
Preheat the oven to 350F and butter a six-cup (1.5 litre) 10 x 4-inch loaf pan and line it with a sheet of parchment paper, letting it hang over both the 10-inch sides.
1 1/4 cups very ripe bananas, mashed with a fork (about 3 bananas)
3/4 cup Quebec maple syrup (Aunt Jemima’s? Forgetaboutit)
1/2 cup butter, melted and cooled
2 eggs
2 cups all-purpose flour
1 tsp baking soda
1/4 tsp salt
Whisk together the bananas, maple syrup, butter and eggs and set aside. In a large bowl, combine the flour, baking soda and salt. With a wooden spoon or spatula, stir in the banana mixture until the batter is just moistened.
Spread the batter in the prepared pan. Sprinkle on the maple crumble. Bake for about 1 hour and 15 minutes or until a skewer inserted in the middle of the loaf comes out clean. Cool completely on a wire rack before lifting from the pan by the parchment paper.
Juicy blackberries from our berry farm, red wine and chocolate give this cake a rich flavour punch.
The blackberries are the last of our berry crops and one of the most beautiful. Their size and juiciness is a marvel enjoyed by us and our bear visitors so picking as soon as they are ripe is important. This very Naramata cake recipe combines our berries with red wine and was a perfect late summer cake for my good pal Janet’s birthday.
Succulent blackberries before picking.Mis en place for the red wine cake with my new antique cupboard from Arundel, England in the background.
Lips that touch wine will never touch mine. Come on, who wrote that nonsense. I suppose they don’t like cake or chocolate either.
I sent The Handyman off to the Naramata store for a bottle of red with a good price point for it’s cake ingredient fate and he came back with a $10 bottle which I was worried was too good to be true…even for a cake. Surprisingly, Bodacious was pretty darn good in the cake and in the chef’s glass.
This recipe makes one three-layer 6-inch cakes that served our party of 10 perfectly with no left-overs.
Red wine cake
1 1/2 all purpose flour
1/2 cup plus 1 tbsp unsweetened cocoa powder (I like Droste, amazing chocolate…)
3/4 tsp baking soda
1/2 tsp baking powder
1/2 tsp salt
3/4 cup unsalted butter at room temperature (never skip the room temperature step…if you don’t have time…put the butter in a bowl in a warm water bath in your sink to soften it up)
1 1/2 cups granulated sugar
1 tsp pure vanilla extract
2 large eggs
1 large egg yolk
1 cup full-bodied red wine
Pre-heat the oven to 350F and grease and flour three 6-inch cake pans and set aside. I did it the hard way and used my one and only 6-inch pan and made the cake in three batches.
Sift together the flour, cocoa powder, baking soda, baking powder and salt and set aside.
In the bowl of a stand mixer fitted with the paddle attachment, beat the butter on medium until smooth. Add the sugar and mix on medium-high until the butter is light and fluffy, 3 to 5 minutes. Stop the mixer and scrape the bowl.
Turn the mixer to low and add the flour mixture in three batches, alternating with the red wine, while taking sips from your wine glass in between, beginning and ending with the flour mixture. Mix on medium for no more than 30 seconds.
Evenly divide the batter among the prepared pans and bake for 23 to 25 minutes or until a toothpick inserted into the centre of the cakes comes out clean. Cool on a wire rack for 10 to 15 minutes before removing the cakes from their pans.
Blackberry ganache ingredients.
Blackberry ganache
3 cups whole fresh blackberries
2 tbs granulated sugar
1 cup chopped good quality bittersweet chocolate
3/4 cup confectioners’ sugar, sifted
Place the blackberries and granulated sugar in a saucepan. Heat over medium-high until the berries start to break down and expel their juices, about 10 minutes. Remove the pan from the heat and strain the juice through a fine-mesh sieve set over a bowl. Discard the solids.
Place the chocolate in a heat-safe bowl and set aside. Reheat 6 tablespoons of the blackberry juice in the saucepan until it begins to simmer (reserve the remaining blackberry juice for finishing the cake). The simmering juice smells amazing p.s. Pour the hot juice over the chocolate. Let sit for 30 seconds, then whisk until combined. Set aside until the ganache cools to room temperature but is still spreadable.
Once the ganache has cooled, whisk to loosen it and stir in the confectioners’ sugar until smooth.
A Naramata evening walk while the cake cools. This view of the lake is on our regular walking route. Never gets old.
Some assembly required
Once the cakes have cooled completely, level them and choose which layer will at the bottom. Generously brush the layers with the remaining blackberry juice. Place the bottom layer on a cake plate or serving dish. Spread about 1/3 cup of the blackberry ganache with an offset spatula. Top with the next layer of cake and repeat with the ganache, finishing with the final layer. Frost the top and sides of the cake with remaining ganache and top with the whole blackberries.
Review
This is an excellent cake from a few standpoints. It’s relatively easy to make as the filling between the layers and the icing is one recipe. It looks great with the blackberry topping and doesn’t involve mad piping skills. Verdict on the taste was a 10 at the party it was served at…”rich, moist, earthy and chocolatey”. I will make this one again.
This recipe comes from fellow Canadian’s Tessa Huff’s amazing book, Layered. Every cake I’ve made from this book has been stellar. Her easy to follow instructions will make you a better baker. As Tessa says, “layer cakes are the ideal vehicle for both creative expression and deliciousness…And let’s fact it — everyone loves a layer cake…It’s time to toss the cake mix and canned frosting and reach the height of your cake-baking potential!” Cheers to that.
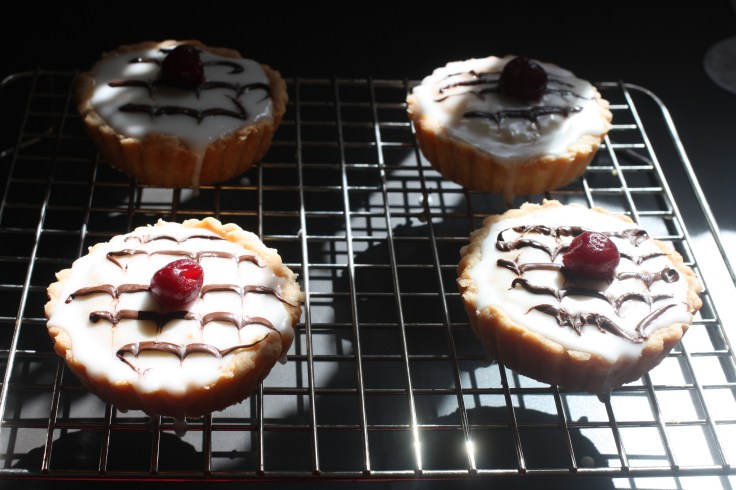
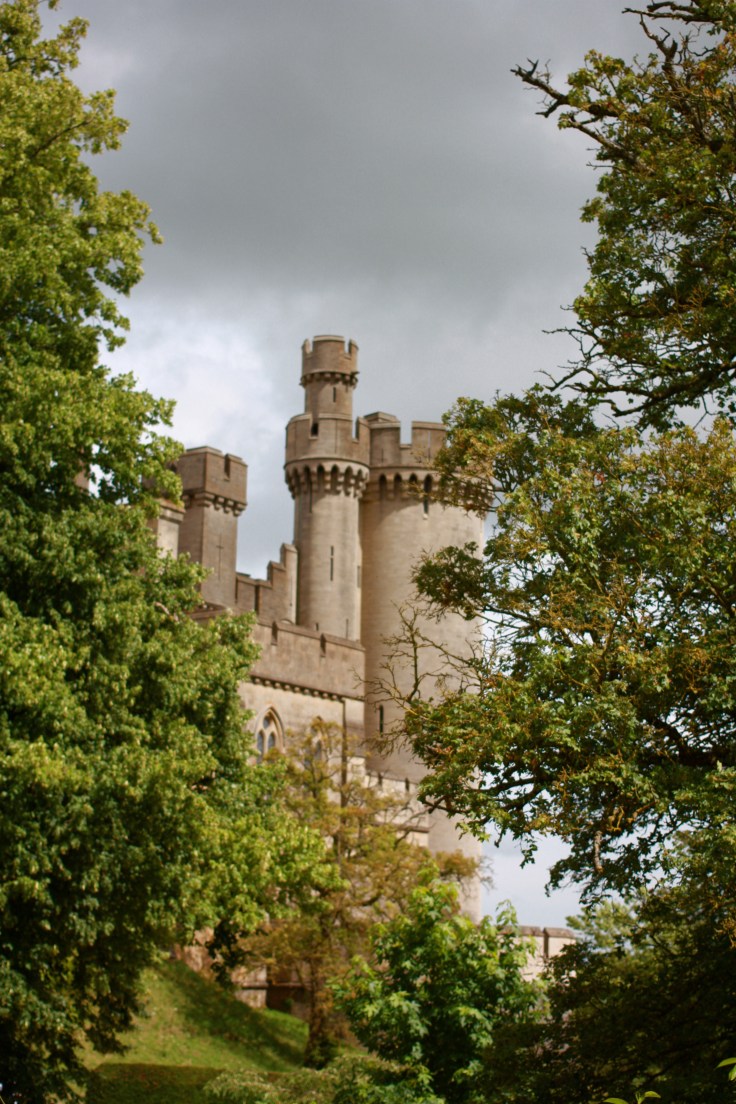
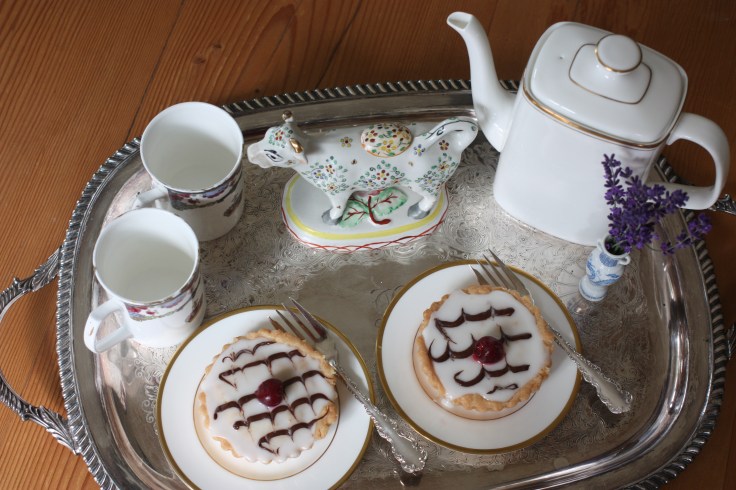
The recipe for these delectable pastry, jam, sponge-and-almond filled tarts comes from Belinda’s tea room in the beautiful castle town of Arundel in West Sussex, England.
Belinda’s Tea Room has been serving up the best of English tea goodies for more than 100 years in a building that originally served as a stable in the 16th Century in the incredibly beautiful historic town of Arundel, England. Introduced to us by The Handyman’s Aunt Ann and Uncle John, Belinda’s is a much-anticipated stop on all our visits to England. Our trip this summer to swim the English Channel on a relay team with friends called for a “double crossing.” We celebrated our swim from England to France with morning tea at Belinda’s, some antique shopping, a tour of Arundel Castle and a second crossing of Tarrant Street for a Belinda’s lunch. My new favourite, Bakewell tart, is served warm with custard and the proprietress graciously shared her secret recipe with me of this magical English invention.
A trip to Belinda’s is just as much about the atmospheric historic building as it is about its teas and cakes.
A bit of Bakewell Tart history…
Despite my idea that a Bakewell is a dessert that is simply baked well, Bakewell is a market town in the Derbyshire Dales district of Derbyshire, England. The town is named after a guy called Badeca and the name means Badeca’s spring or stream (Old English wella). The Bakewell tart started life as a happy accident in pudding form in 1820 when the landlady of the White Horse Inn left instructions for her cook to make a jam tart with an egg and almond paste base. The cook, instead of stirring the eggs and almond paste mixture into the pastry, spread it on top of the jam. The tart version of this accident is made with a shortcrust pastry, an almond glaze topping and an almond sponge and jam filling.Too much information? Get down to the darn recipe already?
Grease and flour one 23cm tart pan or four 10cm tart pans
Shortcrust pastry
All-purpose flour 215 grams
Icing sugar 30 grams
Unsalted butter 120 grams
Egg yolks (free run) 2
Cold water 2 tbsp
Place all the dry ingredients in the bowl of your food processor and give them a quick pulse. Add the butter and pulse until the mixture resembles bread crumbs. Add the egg and water and pulse a few times until the mixture starts to come together. Gather into a ball and wrap in plastic wrap and place into the fridge until required (at least an hour to chill).
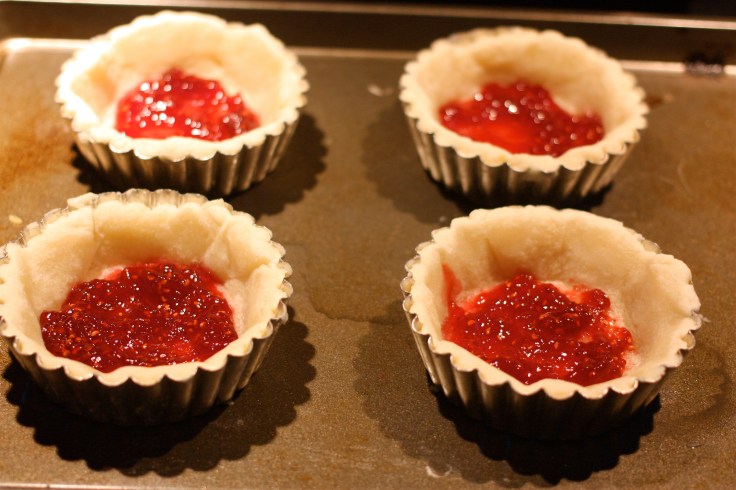
Pre-heat oven to 350F and roll out the pastry. Roll the pastry onto your rolling pin and carefully drape over the tin or tins, easing the pastry into position and trimming off any excess from around the edges. Prick the surface of the pastry with a fork and cover with a sheet of parchment. Fill the centre or centres with baking beans, pie weights or rice and blind bake for 15 minutes.
Once the pastry has been removed from the oven spread 2 tbsp of high-quality raspberry jam evenly over the base.
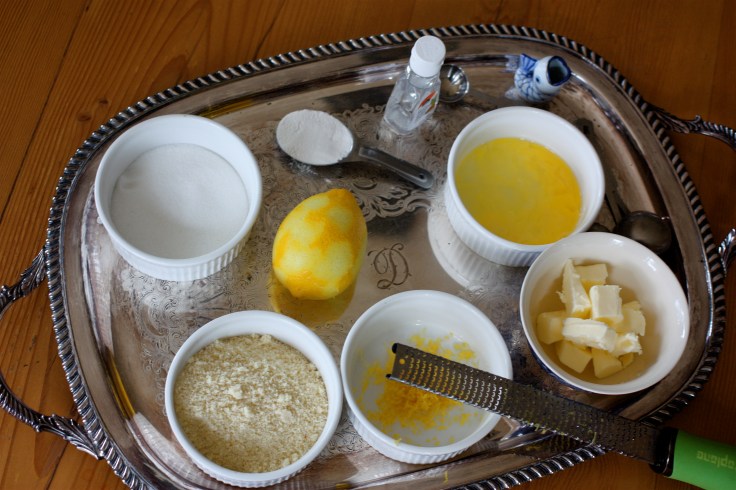
Frangipane ingredients
Frangipane
Unsalted butter 75 grams
Caster sugar (super-fine or fruit sugar) 75 grams
(note…you can make this from regular granulated sugar by using your coffee grinder and grinding for 20 seconds or so…don’t grind too long or you will end up with icing sugar)
Ground almonds 75 grams
All-purpose flour 1 tbsp
Almond extract 1 tsp
Lemon zest finely grated from 1 lemon
Egg, free-range 1
Pre-heat oven to 350F. Cream together the butter and sugar until pale and fluffy, this takes about 5 minutes in a kitchen mixer fitted with a paddle, or a little longer with a hand mixer. Fold in the remaining ingredients and place the mixture in a disposable piping bag. Cut the end off the bag and make a hole about 12mm wide and pipe the mixture evenly into the pastry case over the jam layer. Smooth out gently using a palette knife or spatula. Place the tart tin or tins on a baking sheet and bake for 25 to 30 minutes until the filling is golden. Test with a skewer in the centre, it should come out clean and the frangipane should be firm to the touch.
Cool before frosting.Just a few simple ingredients and some good quality chocolate are needed for decorating.
Icing
Icing sugar 200g
Almond extract 1tsp
Glace cherry or cherries
Good dark chocolate 100g
Mix the icing sugar and almond extract together and add a little water until you have a thick, smooth fondant. Pour the fondant into the tart tin or tins and level with the top. Pipe parallel lines of melted chocolate on the tart and then drag a toothpick across the lines to create a feathered effect. Place the cherry in the centre.
The original Belinda’s BakewellMy Bakewell Tart which The Handyman has dubbed Tastesgreat Tart
Belinda’s recipe translated beautifully but the atmosphere of the tea room in Arundel is only a nice memory in my Naramata kitchen. Here a few photos of Arundel to give you an idea of what my favourite town in England is like.
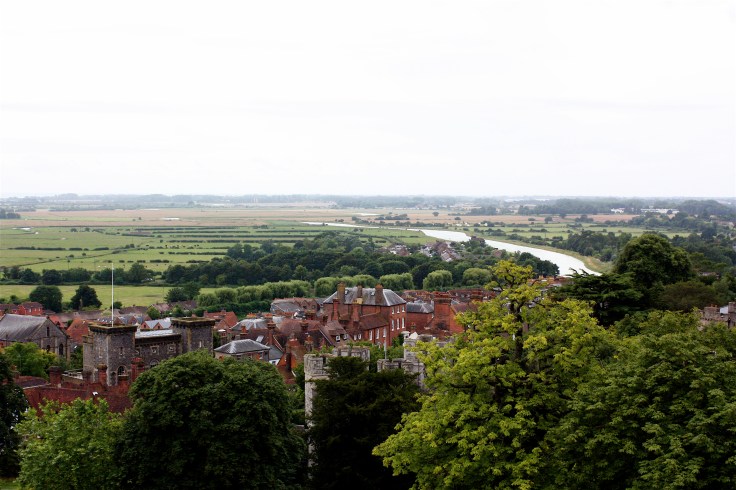
View from Arundel Castle battlements of the market town built along the banks of the River Arun.Arundel Castle was built by the Normans to protect the wooded plain to the north of the valley through the South Downs.Arundel Castle is the seat of the Duke of Norfolk.Just a glimpse of the castle’s gardens.Antique shopping is great in Arundel.Too big for my suitcase…Naramata tea room in my kitchen…
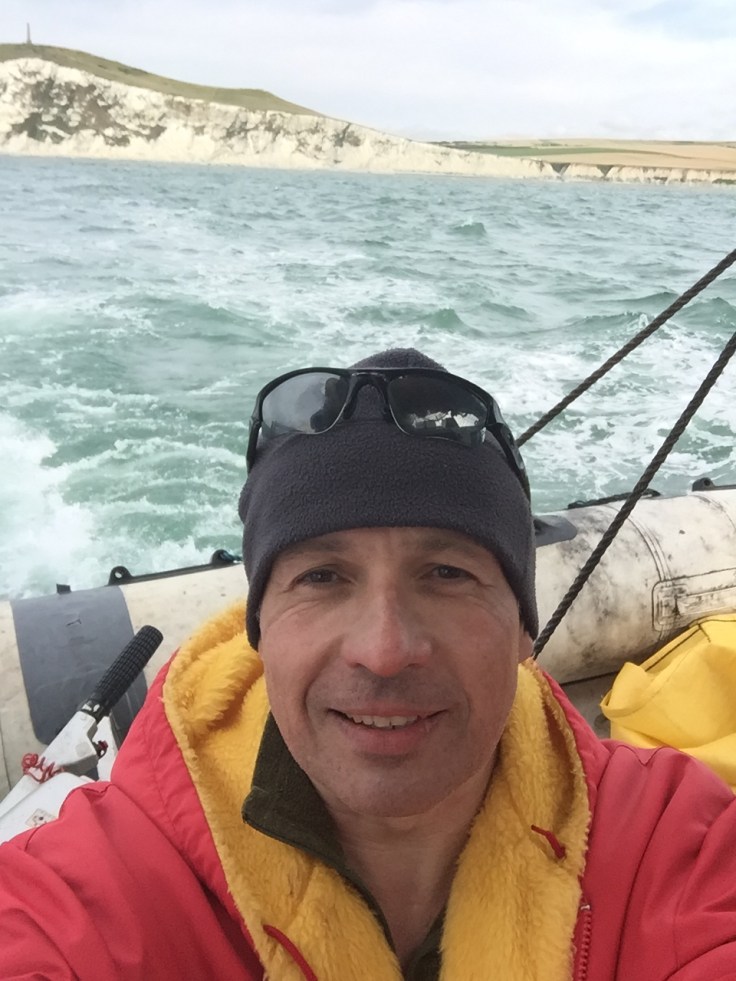
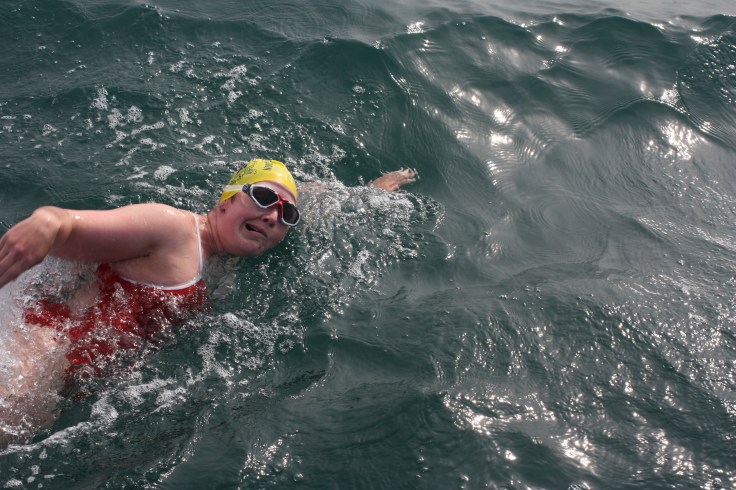
After years of dreaming, three years of planning and training we are motoring out of Dover Marina to begin the Crazy Canucks relay swim to France. Cap and goggles at the ready I’m about to head to the beach at Samphire in the dinghy, jump in, tag the beach and start us on our way to what will be a 13 hour and 47 minute, 50-kilometre swim from England to France.
In our swim order, here are our strongest impressions of our big adventure:
Elaine (leg one (England), seven, and 13)
Motoring out of the relatively calm harbour into a rolling sea in the pitch black at 3 am and realizing the enormity of the task ahead.
Al, my blog’s The Handyman, our alternate and chief crew member giving me a quiet pep talk… “You have to set the tone for the day. No matter how bad it is in there when you come out say it was fine.”
Everything happening so fast but in the midst of it all thinking to myself, “This is pretty cool. I’m standing on the beach in England and me and my friends are about to swim to France. I have to remember to remember this feeling.”
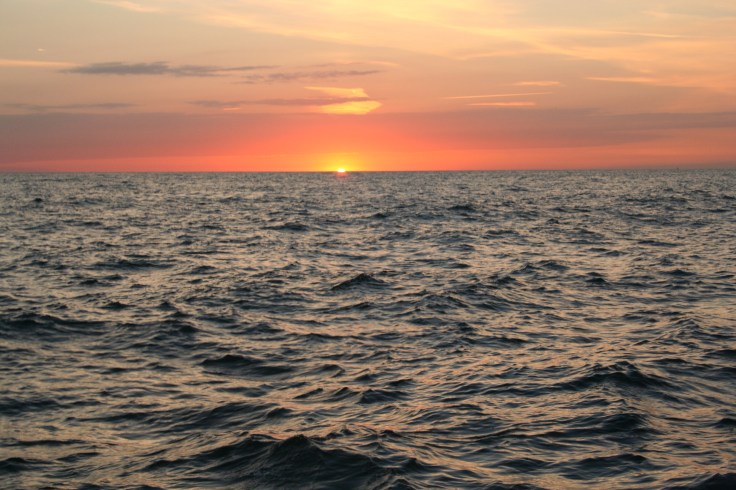
The sun, an orange ball appearing as I breathed to my left and the dark sea. Beautiful.
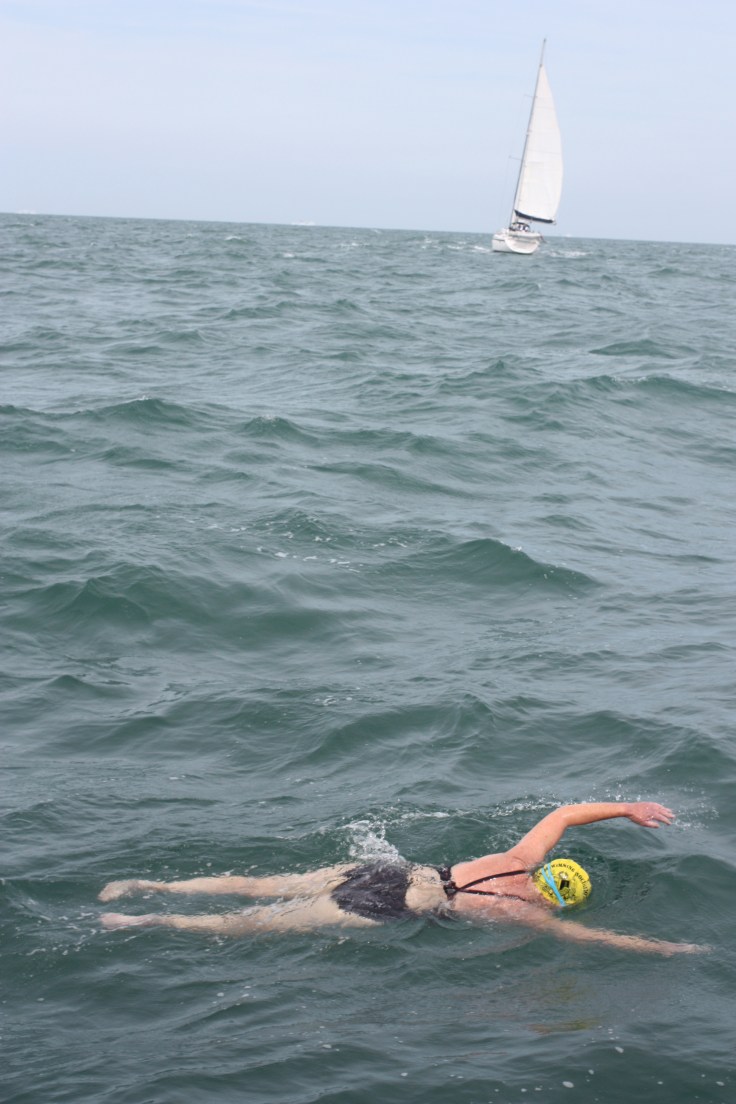
Janet watching me swim as the sun rises.
Swimming steadily with random thoughts going through my head like singing the Sloop John B, wondering if the jellyfish are awake yet, how close should I swim to the boat?, good thing we did all that cold water training as this water is bloody cold, how long have I been swimming? check your form, it’s cool my team mates are watching, wondering what they are thinking? ah, I get how this works I swim up to near the front of the boat and then he turns the engine on for a minute and I’m near the back of the boat…this is normal, I wonder how this relay exchange thing works in practice and how easy it will be to get up the ladder? with the leitmotif always coming back to I am right now, this very minute in the waters of the English Channel swimming to France. How cool is that? Right?
Resting between swims lying down in the boat and still being able to hear the rhythmic slaps on the water from my team mates’ arms as we make our slow, steady progress toward France and tearing up with the thought of all that means. We are swimming France and I have some cool friends to do this with me…
Watching Janet in the water at the rail of the Viking Princess after her being so seasick and having to walk away unable to watch anymore with a mixture of pride in my friend while feeling badly for putting this scheme into action and testing her in a way that at times seemed might be beyond her limits. (It wasn’t — she is made of tougher stuff than even she knew I think.)
Taking a sighting, always trying to keep an even distance from the boat.
About three hours in watching Janet and Charlie feeling so ill and thinking, oh my God, I don’t think we are going to make it. This is too much. We are all going to be back in this boat and heading back to England and that will be that.
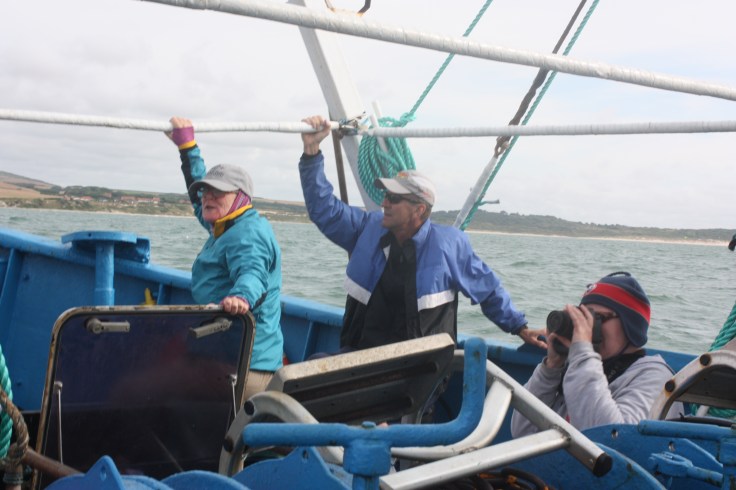
All the small interactions with team mates, support crew, boat pilots and observer throughout the day. Helping Charlie warm up after her swim when she was shivering uncontrollably and being sick equally uncontrollably but still magically, somehow, retaining her sense of humour. Borrowing John’s warm swim coat and realizing afterward what a brilliant job he did all day making videos and taking spectacular photos (much of which was used by Wayne to make a fabulous video). Confiding in Al my worries about not making it and his helpful, calm, reasoned, supportive presence. Keeping a close eye on Janet in the water and cheering her on extra hard. Chris’ calm, steady influence throughout the day and his general good humour and quiet confidence. Jaime’s excitement about the day and her can-do attitude that helped us look at it as somewhat fun. Watching Charlie give Ray the thumb’s up signal asking him to turn on the generator for the kettle. Gruff swearing Ray getting us all off and up the ladder in one piece. Coming out of the water cold and a bit overwhelmed each time to find someone with a warm towel and words of encouragement so you can muster it up to get back in there again even when the waves got huge when the time comes.
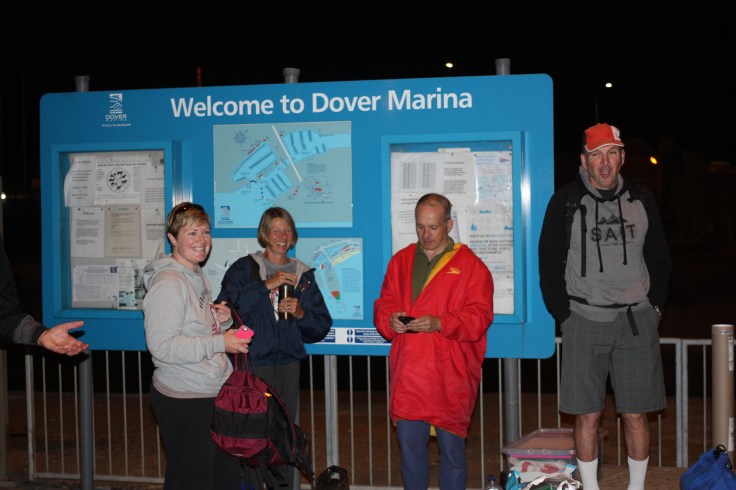
Having our English Aunt Ann and Uncle John such a big part of our adventure was amazing. From visiting Dover with us two years before our swim, to buying the team a round when we first arrived in England, providing us with towels, sporting our team sweatshirts, coming to Dover to be a part of it and getting to know the team at dinners and the pub, hosting Jaime at their lovely home after we left Dover and listening to our tale and sharing our excitement as they greeted us at the Dover Marina on our return and a ton of other supportive things means so much to me and Al and now the rest of the gang too.
Being so close to France for so long and making no discernible progress for hours thinking again that we wouldn’t be able to push through the current and get there or that it would take so many swims from each team member that the sicker guys would peter out. The wind and waves are building to a crazy pitch at this point too adding to the thoughts about the impossibility of it all.
Getting in for my third swim with words of encouragement from boat pilot Ray and swimming harder than I ever have in my life while still having no idea if we were getting an inch closer to France.
Climbing up the ladder and seeing that we were so close that we were actually going to make it! Total and utter breakdown. All the emotions and worry I had bottled up for 13 hours come flooding out…laughing and crying and ecstatic. This is what blows my hair back. This is why I want to have more adventures to spice up the hum drum to give me things to think about when I’m lying in bed at night. This exact minute of complete elation I have carried around with me every day since July 26 and hope to carry at least a spark of it forever. WE SWAM THE ENGLISH CHANNEL.
John’s first leg with the White Cliffs of Dover looking pink in the sunrise.
John (leg 2, 7 and 13 France)
Two things stand out for me. Seeing the dinghy with no spare swimmer in it meaning they thought I’d make the beach! Then actually getting to the beach. After pouring it on for the third swim and wondering if I was going to make it, these two highlights will stick in my mind forever. The beach being the most vivid!
The beach fought me. I thought I was in and stood up and started striding but then it dropped off again and I was back swimming some more. I couldn’t stand up on the final beach rocks and my toes jammed between them. They were sore for a couple of weeks afterwards. I had to crawl on all fours. The surf was a bit of an issue but the water got much warmer in the shallows! Making damn sure I got above the high tide line and up close and personal with the cliff. Oh yeah, everyone wants souvenirs — where to put the rocks from the French beach? I realized I had to swim back to the dinghy and couldn’t hold handfuls so I filled up my speedo!!
Coolest selfie ever. John in the dinghy as it returns to the Viking Princess after he touches France.
Worst moment? No much, maybe the shivery half hour after the first swim where I thought hmmm….this is going to be hard and the thought of two, possibly three more swims seemed daunting. Seeing how seasickness was becoming a factor with the team was also worrisome.
I am viewing this as a once-in-a-lifetime “bucket list” event. And of course, it would not have happened at all without Elaine’s dream. I am really glad you had this dream Elaine.
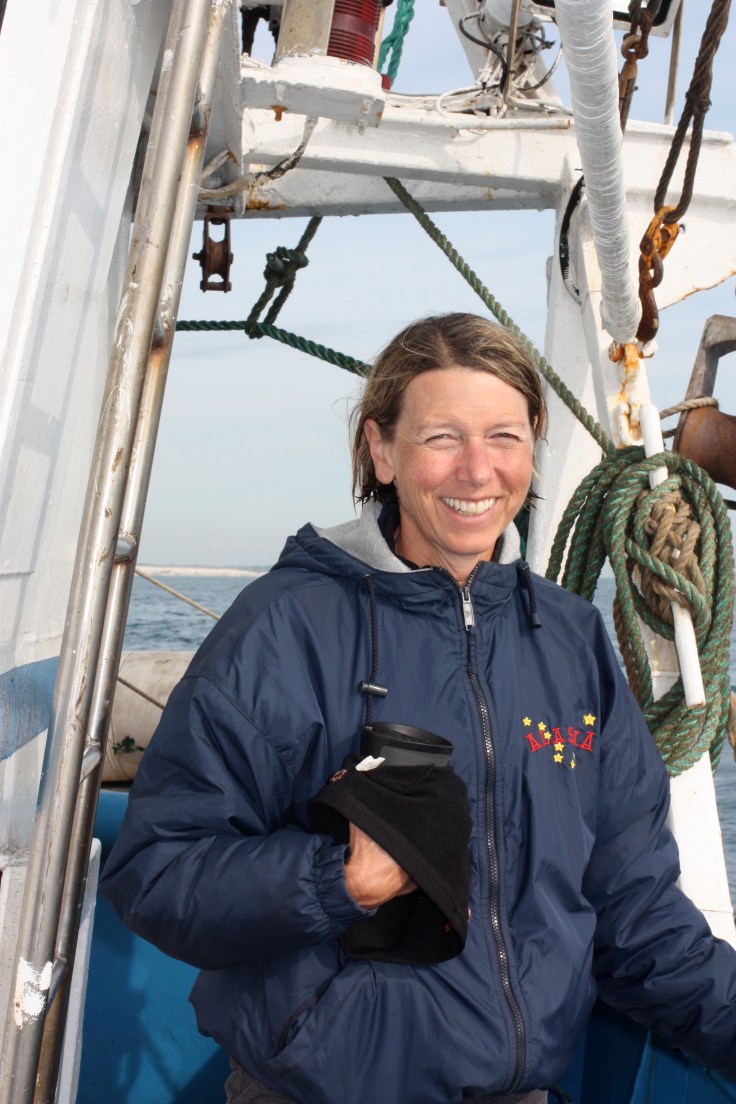
Charlie (Legs 3 and 9)
Charlie’s unforgettable leg 3 was the most beautiful of the day as the sun lights up her swim path in the busiest shipping lane in the world as she races the ferry heading for Calais.
We have all used the word EPIC a lot describing this adventure and I really can’t think of a more fitting term to sum it up. I am no stranger to ultra distance racing and pushing beyond what I had perceived my limits to be. This swim was different in the fact that the actual swimming was the easiest part. All the fears and mental hurdles proved to be more challenging as did the physical ones of seasickness and hypothermia. In most other events I have been able to train in similar conditions (weather, hills, distance, terrain, etc.) to prepare myself. In this case, the only way to prepare for swimming in the middle of the ocean with no land marks as points of reference is to do it when your boat pilot says it is go time.
Not many grandmas can share a story like this with their grandkids. I hope it lights a spark in them to set a crazy goal of any kind and achieve it one day when they are older. Maybe one of them will take me to school for show and tell, if they still have such a thing.
Her smile belies the seasickness and hypothermia Charlie endured throughout the day.
The best part for me has been the sense of accomplishment and camaraderie our team developed. the media coverage was so unexpected but pretty cool, especially the congratulatory postings from celebs like the Queen and the Prime Minister.
One of more than a dozen articles published. We were also featured on CBC Radio.
None of us would have succeeded without the support of our life partners. Mine was outstanding even though he thought I had lost my marbles when I agreed to give it a go. And of course this absolutely would have never been possible if not for the dream of our Den Mother and all her planning and cat herding. Huge shout out to Elaine.
I have three tips for anyone thinking of making the attempt:
1. Book the Viking Princess, piloted by Reg and Ray Brickell. Best there is but you need to book early. I am still in awe of the way they stayed so laser focussed on so many computer screens, radars, radios and cameras to keep us out of harm’s way, even when the seas turned nasty. It was obvious by their excitement and celebration when John succeeded in climbing ashore in France that escorting swimmers is more than a job to them.
Warming up
2. Stay at the Churchill Guest House. Alex was so welcoming, helpful and supportive. Cool old house with lots of British character, kitchen and laundry facilities and perfect location to walk to restaurants, grocery stores and the beach for a swim.
3. Have a chat over a pint with someone who has done the swim or at least attempted. I’m available if they are buying.
Chris getting psyched for his swim with Dover’s White Cliffs looking rather black.
Chris (Legs 4 and 10)
Definitely one of my life highlights for me. I have been fortunate to have done some pretty interesting things, seen some great places and this really is one of the best.
I was super impressed with the way we handled ourselves. Supportive, gutsy, can do attitude. Calm, cool and collected. Keep Calm and Carry On! I think we all just decided we were going to be successful and put our minds to it. Well done.
I think out of the water was great! Very nice to travel with the gang and we got along famously. I think that translated into the way we did the swim.
Would I do it again? Yes. I think it is one of those iconic events and I’d be happy to help another team make it happen for themselves.
Chris had some amazing legs and made tracks for the team.
I am very happy that I was part of this team effort. This is something that I would never take the initiative to do and I am grateful to Elaine for dreaming this, making it a reality and for inviting me along for the fun. What I learned about me? When I put my mind to it, I can dig deep and get it done, the training, the cold water swims and the day itself. It was not easy but doable. I know I would do whatever I had to to hold up my end of the bargain. I trusted that everyone else would. I was nut surprised that everybody did.
Biggest revelation? Shit we were lucky. The stars aligned for us. Give or take, 50% don’t hit the water (weather), 50% of those don’t make it. That is a 25% chance you will be successful. Not good odds. But we did it. I think Elaine added some descriptive words to that?! (Yes, I sure did.)
Many thanks to each of you for a wonderful adventure. Next! (Editor’s note…there is a move afoot to attempt a Crazy Canucks relay of the Catalina Channel in California in 2018…at least with a good representation of the team and possibly some new blood.)
Janet (Legs 5 and 11)
Janet powering through the biggest waves of the day.
The swim was monumental in every way! The training, the injuries and then doing it against all odds — for me at least. I would never have thought that I could come back from my panic attack a few years ago to swimming the English Channel.
-I can do this! Swimming in the ocean at Kona with Elaine, joining the master’s swim group, swimming in the lake bit by bit, doing the Across the Lake and Rattlesnake swims and finally the channel all with Elaine’s encouragement and companionship and in the end the channel – who knew!! A sense of accomplishment – I have butterflies again writing this.
The swimming part turned out to be the easiest part even with the big waves – there was no fear which was very surprising – I can do this. Fortunately the jellyfish were below me so they weren’t an issue and I wasn’t worried when I saw them. On the second swim I didn’t see any jellyfish. I really appreciated seeing everyone watching me from the boat – when people left I wondered what had happened to them. Mostly my thoughts were still except for thinking I’m doing this and not letting anyone down.
Best parts were getting it done. I really appreciated the group of people I was with – no one freaked out when I started throwing up – there was silence for a minute I think but then everyone went back to what they were doing. There were suggestions to change positions in the boat and to lie down which were gratefully appreciated.
Janet, Chris and Jaime and…oh yes, that is France in the background.
The worst part was the sea sickness – I felt so helpless but it never occurred to me not to do my swim although I found out later I caused everyone a bit of concern when I got in the water.
Everyone has been pleased for me for doing it but I don’t think people get the enormity of it. It is really hard to put into words what we went through.
I would like to thank my rock Chris who got me through the sea sickness and supported through every step of the three year journey. I would like to thank the team for taking over my watches. The team really came together even though we hadn’t spent much time training together – I didn’t meet John until we got to Dover. Most of all I would like to thank Elaine for everything she did to get me to the goal. Even though Ray came across as a real tough guy his job was to get across safely and he certainly did that. Reg was a charm. Alex was wonderful – he was there with suggestions when needed – he was quietly supportive and helpful – the perfect host.
It was an amazing day full of life long memories and friendships. Thanks.
Janet, Charlie and Elaine…Photo Penticton Herald
Jaime (leg 6 and 12)
Jaime never stopped smiling all day.
I think the whole experience is still really sinking in. Looking at the stats the other day and realizing that we are one of only 5 Canadian relays to ever swim the Channel (through the CSA anyways) was a bit eye opening. As well, there have only been 36 successful solo swims by Canadians. That makes our adventure all that more remarkable!! Thanks for having this dream, I would never have been involved in anything like this if not for you.
HIGHLIGHT MOMENTS – not getting sea sick. Probably sounds sort of selfish but this was my biggest fear and whether it was the Bonine or my natural sea legs, I was extremely relieved that I felt good all day. Can’t imagine what Janet and Charlie endured. – the look on your face when you realized John was going to make it to France – pure joy! One of my favorite pictures and moments of the whole day! – I will never forget the feeling I had hanging onto the ladder as I waited to jump in for my first swim. What a huge mix of emotions – my heart was pounding out of my chest! I was shaking I was so excited, nervous, exhilarated and down right terrified! Then it was go time and there was no time for hesitation, I just had to jump in and swim. Wow, getting a bit emotional just thinking about it. Definite highlight in my books. – my second swim in the big waves was SO MUCH FUN!! That was one of the most enjoyable parts of the day for me. I remember the boat lurching back and forth so much that when I turned to breathe, sometimes it seemed like I could reach up and touch John and Al. Pretty cool experience. – John reaching France of course and seeing Chris and Charlie holding up the Canadian flag as he made is approach
WORST MOMENTS – watching how ill Janet was getting and wondering if I would even get a chance to swim if she wasn’t able to make it through her first swim. Thank goodness she was a trooper! – after Charlie got an update on our progress and was told that there was a possibility that some of us would have to swim 2 or 3 times more. That was disheartening news and I started to question to some extent our ability to make it. – not having my family in England with me to share in this experience. Even though I know it was not a kid-friendly kind of trip and there is absolutely no way we could’ve managed it financially, it would’ve been the icing on the cake to have Ian and Ella there. Ian would’ve been in his glory had he been able to come on the boat – he would’ve loved chatting with Reg!
Jaime swimming strongly on her first leg.
THINGS I WON’T FORGET – the hush that fell over the boat as we left the protection of the Dover Marina and headed out to sea. There was definitely a lot of nervous energy. I’m not sure about you, but I was thinking “Holy shit! What the hell have we signed up for?!?!” Not too long after, I saw you swimming alongside the boat in the dark, steady and strong strokes and thought “Hey, this might not be so bad” – the jellyfish – I will never again in my life witness jellyfish like I did during my first swim. There were so many of them down below and although I was frightened at first, the fear diminished and they were really amazing and beautiful creatures to look at. Not many people get a chance to see them from that point of view. Pretty frigging cool. – the taste of the salt water. My tongue felt about 3 times it’s normal size! – the great sleep I had in the hold of the boat on the way back to England. The hum of the engine and sound of the boat bouncing off the surface of the water was mesmerizing. Best sleep I had in days! TRAINING I am happy with my training given my location and juggling of work and family life. However, I wish I could’ve made it up to Sylvan Lake more often than I did and a trip to Vancouver for a couple of dips in the ocean before hand would’ve been nice. Just wasn’t in the cards though. Glad I did both the Rattlesnake and Across the Lake swims in 2015 without my wetsuit. Definitely boosted my confidence knowing I didn’t have to rely on the buoyancy of my wetsuit to feel comfortable in the water. What I think was most difficult was training on my own – you, Jan and Charlie were lucky to have each other to swim with. I think a proper Master’s swim group would’ve been a benefit to me as well but Innisfail doesn’t offer one. I did improve my speed a little bit over the past few summers but I was hoping to be a bit faster than I was. Oh well, I may have lacked in speed but at least I wasn’t cold! That is what I am most proud of. It’s very intriguing to me how you can train your body to tolerate the cold water. I really began to enjoy swimming in the cooler water and I think all of my ridiculous dips in the cold lake served me well. The only time of the day I was really cold is when I woke up in the hold of the boat after my big nap on our way back to England.
Jaime, Charlie, John and Al at 3 a.m…Little did we know…
CHURCHILL GUEST HOUSE Can’t say enough about these guys. The accommodation was lovely as were the hosts. Alex really went above and beyond to make us comfortable and help us out in any way he could when it came to our swim. Betty can cook a mean breakfast too. Thoroughly enjoyed my stay and like I said, the set up of the guest house and close proximity to the downtown made it a much better choice (in my opinion anyways) than Varne Ridge.
WHAT’S NEXT? This was definitely a once in a lifetime “bucket list” type of adventure for me. So glad you talked me into doing it – it was such an unbelievable experience! Have no desire though to do a solo swim or another relay. Curious to see what you guys come up with for new swim adventure ideas! The swimming across to Summerland with the bottle of wine sounds fun!
Jaime’s photo of the sunrise on the Channel during or first leg. It’s her fb photo now and hope it stays up for a long time. Unforgettable day.
 My recipe is a modern version using a crockpot, an apple peeler (can peel by hand) and an immersion blender (can use a blender or a whisk) and requires no all-day wooden paddle manning. Maybe I’m missing out although I’m happily married to my swain, The Handyman…